Introduction
“Git is a free and open source distributed version control system designed to handle everything from small to very large projects with speed and efficiency.

“Git is a free and open source distributed version control system designed to handle everything from small to very large projects with speed and efficiency.

“Git is a free and open source distributed version control system designed to handle everything from small to very large projects with speed and efficiency.

Centos EPEL – In the following tutorial I will show you how to add the fedora EPEL repository to your CentOS installation
.
In order to install CentOS EPEL Repository you need:
yum install wget
check here for latest version of epel-release-x-x.noarch.rpm
wget http://mirrors.nl.eu.kernel.org/fedora-epel/6/i386/epel-release-6-8.noarch.rpm
rpm -Uvh epel-release-6-8.noarch.rpm
rm epel-release-6-8.noarch.rpm -f
or in short:
rpm -Uvh http://download.fedoraproject.org/pub/epel/6/i386/epel-release-6-8.noarch.rpm
That’s it! You’ve added CentOS EPEL repository to your centos installation.

You may need the EPEL repositories for Centos.

“Git is a free and open source distributed version control system designed to handle everything from small to very large projects with speed and efficiency.
Git is easy to learn and has a tiny footprint with lightning fast performance. It outclasses SCM tools like Subversion, CVS, Perforce, and ClearCase with features like cheap local branching, convenientstaging areas, and multiple workflows.” http://git-scm.com/
If you don’t already know what Git is, take a crash course. Git (Wikipedia)
There’re many Git clients available for windows, like Git, msysgit, QGit, GitCola, TortoiseGit, SmartGit (FREE and Commercial) and others. not to mention existing eclipse, visual studio extensions. You may choose what’s suits you best.
I’ll demonstrate using the GitHub for Windows GUI. Download it Here.
Those instructions are for version 1.8.0-preview20121022. your installation may be different.
Installation is fairly simple, Just press <NEXT> 6 times to the end (don’t forget to READ the GNU General Public License!). the default options are ok for any starter.
If you know what you are doing, read each step carefully, if you need to add the Git or Unix tools from the windows command line, you should enable it during the installation. i recommend Git Bash only, Windows command Prompt (second option) ok too. should be safe, I find it rather useless. the third option is only for experts. do it on your own risk!
By default the Git Setup uses OpenSSH bundled. If you are using Putty, you can enable the Tortoise PLink at the setup wizard.
I recommend leave the default line ending windows style.
If the Repository meaning is unknown to you, read this.
For Start your will create your own local repository.
You need an empty folder to create your repository in. create a <New Folder> folder on your desktop, drive d, or anywhere you want, as long as you remember where.
Now, Like almost anything in git, start the new repository (git init) can be done in several ways:
Maybe, the simpleist way, is the context menus. select or create a new empty (or not) folder anywhere, right click it and then select <Git Init Here> (It may be under X64 menu in x64 systems).
Start your Git Gui > Create New Repository > Browse (Select your empty folder) > Create.
It may not suited for anybody, but: right click a folder > git Bash
git init
or start Git Bash from your start menu and then use cd to find your folder, for example:
cd /D/Projects/c++/New Folder

git init
If you have installed the command prompt you can use windows command prompt to locate the folder and then <git init> the same you whould do in git bash.
Any way you’ve choosed, will create an hidden <.git> folder inside your folder which saves all the data for your repository. you can delete the .git folder to delete your local repository and disband anything you made using git and your folder returned to be an normal empty folder.
You can check your repository status:
if you are just created your new repository, you are in the status screen. Just press to Rescan button to update.
You can load Git Gui anytime > Open Existing Repository > Browse for your folder.
another easy option is to right click the folder on your file browser and then select the <Git Gui> context menu and read the above.
you can now use the
git status
from Git Bash or command prompt anytime to view your local git status (you need to be inside the project folder for this command to work)
Your repository saves the folder versions as commits. before you can commit each commit, you need to add the files you want to be in this commit. if your folder is still empty, you can create now a file or two. just for practice.
maybe it’s a good time to create your README.MD file.
The first thing to do before you can commit is to identify yourself so Git will know what name to sign on your commits. You can change it anytime but commits you’ve made with this sign will stay. if you won’t configure it, you will get an error later when you’ll try to commit.
Identify yourself can be done only by using the Git Bash or command prompt:
git config --global user.email "you@example.com"
git config --global user.name "Your Name"
Omit –global to set the identify only in this repository.
The context menus have only one option when you right click the folder or anyfile inside it – <Git add all file now>. It will check all the files inside the folder as belong to the local repository and will add(flag) them as to be saved in the next commit.
This feature won’t suit in most cases as it set all files and won’t let you leave files as not belong to the repo – which is commonly done.
Took me time to find this, click on the icons of the files in the Unstaged Changes area to add them to current commit. you can also click the Stage Changed button to add them all.
click on the file icon again on the Stage Changed area to remove the file from this commit.
After you’ve selected the files (and directories) to be in the commit, Insert an Initial Commit Message and Press the Commit button to commit :).
Beside the social benefits of git, local repository helps you track versions of your files. compare them, and restore older version if needed. when git init command creating the .git folder in the first time, it doesn’t track no file. to add files for track you need to use the
git add <filename>
for example you can create an empty (or not) file called README.MD and type:
git add README.MD
you can use wildcard (such as git add *.conf). this way you can add files to the current commit, and when you ready type:
git commit -a
you need to provide a commit description. using vim by default (can be changed), and you updated your repository with you first commit.
Inside your hidden <.git> folder, git has saved a copy of all your (selected) files inside this repository. this called a commit. now you can continue edit your files, knowing you can always go back to this point again.
If you want to get a copy of an existing Git repository — for example, your github hosted project or other project you’d like to clone local or contribute to — the command you need is
1 | git clone |
. the following example will cover this topic clearly.
git clone https://github.com/WordPress/WordPress
this line will create a folder inside wherever folder you are located in called WordPress and clone (copy) to it all the files from wordpress repository. you will see inside a .git folder also, which mean you can continue now with your local repository, and even update the source if you have the permission to do so.
to update your local version with the server later:
git pull
you can also use the Git Gui to clone existing repository, just supply the source location and the target directory.
After everything installed and configured, I’ll demonstrate using the above functions to connect to GitHub repository. I’ll demonstrate only using Git-Bash, but feel free to use the other methods as you like.
First step is to create your repository at Gitghub. if you haven’t yet read the following:
Create A Repo – goto New Repository page in github and create your new repo. this tutorial is for public & free repo.
you can set a README.MD file to be clone ready immediatly. the following is for a new repo without README.MD:
after you created a new repository you need to git it to a folder.
follow inside new directory:
touch README.md

git init

git add README.md

git commit -m "first commit"

git remote add origin https://github.com/<your-user-name>/<project-name>.git

git push -u origin master
To disable username & password request each time, you need to use ssh authentication, which is behind the scope of this article.
if you already have a project your want to create the repo from just go inside your folder, git init it like above, git add neccesary files (you can use wildcard!) and then resyne the last three line above.
if you have a local repo which you want to link to your new online repo just use the last two lines of the bash code above.
* more info: Create A Repo tutorial on github
to push your updates to the server:
git push
to update your local version with the server is the same:
git pull
to reset all the changes you made from the last commit just use:
git reset --hard
to see the changes made in your git from the last commit use:
git diff
‘Q’ for exit. 😉
Those are the basics of Git. you can do a lot more with version control and collaborate with others.
Happy Git-ing…

We want to mount an iso file to a folder. with linux it’s soooooo easy!

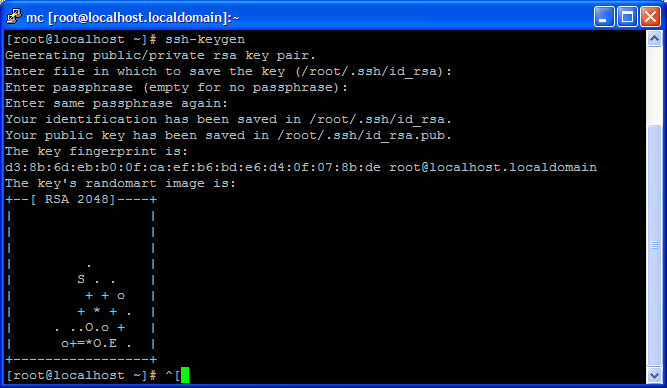
How to establish SSH connection without password between two linux/unix machines
ssh-keygen
scp -r -P 22 /root/.ssh/id_rsa.pub destination:/root/.ssh/authorized_keys<em>

</em> Now you can connect as root without a password between the servers.

“Git is a free and open source distributed version control system designed to handle everything from small to very large projects with speed and efficiency.

Security, speed, compliance, and flexibility — all of these describe lighttpd (pronounced lighty) which is rapidly redefining efficiency of a webserver; as it is designed and optimized for high performance environments.
With a small memory footprint compared to other web-servers, effective management of the cpu-load, and advanced feature set (FastCGI, SCGI, Auth, Output-Compression, URL-Rewriting and many more) it is the perfect solution for every server that is suffering load problems.And best of all it’s Open Source licensed under the revised BSD license.

NOTE: This article was rewritten (for CentOS 6.4). please read the updated post.
“Python is a general-purpose, high-level programming language whose design philosophy emphasizes code readability. Its syntax is said to be clear and expressive.” from Wikipedia.
Visit http://www.python.org/
“Django is a high-level Python Web framework that encourages rapid development and clean, pragmatic design.” from https://www.djangoproject.com/

if you have installed new setup of centos minimal or you haven’t installed yet, you need make, gcc, kernel-devel in order to Install VirtualBox Guest Additions installation script.

BOINC is an open-source software platform for computing using volunteered resources, Use the idle time on your computer (Windows, Mac, or Linux) to cure diseases, study global warming, discover pulsars, and do many other types of scientific research.