Template engine
In the following post I’ll try to show and explain how and why I am using two template engines in every application I’m working on. Also, why and how I am choosing my template engine(s) I’m working with.

In the following post I’ll try to show and explain how and why I am using two template engines in every application I’m working on. Also, why and how I am choosing my template engine(s) I’m working with.
centos gunicorn : In this simple tutorial I’ll explain how to install and run Gunicorn python server on your CentOS machine.
This tutorial is meant for Centos 6.4 and above but it should work on any CentOS 6.x release.
From: Gunicorn – Python WSGI HTTP Server for UNIX:
Gunicorn ‘Green Unicorn’ is a Python WSGI HTTP Server for UNIX. It’s a pre-fork worker model ported from Ruby’s Unicorn project. The Gunicorn server is broadly compatible with various web frameworks, simply implemented, light on server resources, and fairly speedy.
before you going to install the centos gunicorn server you need to insure you have the python interperter installed (it should be, as it’s installed by default on the latest CentOS releases). to check that you have python use the command:
python
command not found of course means you need to install python now.
first make sure your have python installed. Simple as:
yum install python
test python by typing: “python” and you should see something similar to:

(Ctrl+D to exit)
Next we need to install gunicorn. for this we have (as always) several choices.
1) Using YUM. I personally don’t recommend it. I know some are happy to use the system packaging management wherever possible, but as for python I don’t think it’s the way to go.
To install gunicorn using yum:
yum install python-gunicorn
2) Using easy_install. using easy_install is a better choice for my taste to install python packages. this is how you install gunicorn using easy_install, but I recommend installing gunicorn using PIP as I will show next…
yum install python-setuptools
easy_install gunicorn
3) Using PIP: This is my RECOMMENDED way of installing gunicorn. to install PIP you actually need easy_install so the commands are:
yum install python-setuptools
easy_install pip
pip install gunicorn
I can’t recommend enough to start working with virtualenv from beginning. At some point in the future, if you are going to consist with python coding, you are going to use the ‘pip update’ command to update some or all your libraries and then expect your python application to stop working.
Python libraries, as any open source library, have the freedom to sacrifice backward compatibility for new features, performance or redesign.
Virtualenv is a python virtual environment tool to ensure that your python applications will work as expected as long you don’t deliberately update some or all of the dependency libraries for that virtual environment specifically.
To install virtualenv (and virtualenvwrapper) and learn the basics read this tutorial. then create your virtual environment and install gunicorn to that environment.
# after you've install pip, virtualenv and virtualenvwrapper
mkproject myapp
workon myapp
pip install gunicorn
Basic usage:
$ gunicorn [OPTIONS] APP_MODULE
so for the following myapp.py file:
# -*- coding: utf-8 -

def app(environ, start_response):
    data = 'Hello, World!\n'
    status = '200 OK'
    response_headers = [
        ('Content-type','text/plain'),
        ('Content-Length', str(len(data)))
    ]
    start_response(status, response_headers)
    return iter([data])
just run:
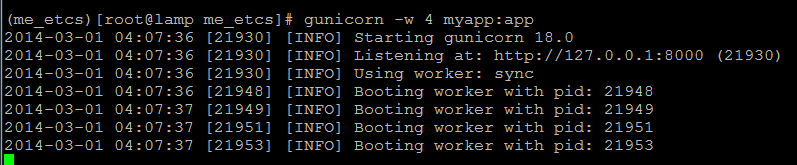
gunicorn -w 4 myapp:app
# Sample output
[INFO] Arbiter booted
[INFO] Listening at: http://127.0.0.1:8000
[INFO] Worker spawned (pid: 16801)
[INFO] Worker spawned (pid: 16802)
[INFO] Worker spawned (pid: 16803)
[INFO] Worker spawned (pid: 16804)
centos gunicorn
This command starts gunicorn with 4 workers on port 8000. feel free to experiment and customize the command with additional parameters.
There also command line for using Django <1.4 and Paster. read more here.
Read more about configuring Gunicorn and configuration files.
on deployment, It’s strongly recommended to use Gunicorn behind a proxy server.
I personally prefer nginx but it’s not your only choice.
If you want to install nginx on your CentOS machine follow this installation instructions.
use this script (at github) to configure your nginx to pass request to the gunicorn process
Usally you’d want the gunicorn to be run in the background, load on boot and restart on errors. you want also the ability to monitor that process.
There are several tools for that.job, including: Supervisord, Gafferd, runit and many more… choose what fits you best. here you have examples for monitoring gunicorn using those tools.
That it. enjoy playing with your centos gunicorn setup.
So you want to build your first django centos 6.4 based web site? This is quite easy to install and configure. I’ll cover how to install Python/Django on your centos.
![]()
“Python is a general-purpose, high-level programming language whose design philosophy emphasizes code readability. Its syntax is said to be clear and expressive.” from Wikipedia.
Visit http://www.python.org/
“Django is a high-level Python Web framework that encourages rapid development and clean, pragmatic design.” from https://www.djangoproject.com/
![]()
you may need the EPEL repositories for Centos.
1 2 3 4 |
cd /opt/ wget http://mirrors.nl.eu.kernel.org/fedora-epel/6/i386/epel-release-6-8.noarch.rpm rpm -Uvh epel-release-6-8.noarch.rpm rm epel-release-6-8.noarch.rpm -f |
cd /opt/
wget http://mirrors.nl.eu.kernel.org/fedora-epel/6/i386/epel-release-6-8.noarch.rpm
rpm -Uvh epel-release-6-8.noarch.rpm
rm epel-release-6-8.noarch.rpm -f
Simple as:
1 |
yum install python
|
yum install python
test python by typing: “python” and you should see something similar to: (CTRL+D to exit)
At the time of writing (September 30 2013), the version of python@EPEL is 2.6.6
Django works with any Python version from 2.6.5 to 2.7. It also features experimental support for versions 3.2 and 3.3. All these versions of Python include a lightweight database called SQLite so you won’t need to set up a database just yet unless you need other SQL
Django works with several DB engines. for simplicity, Install SQLite:
yum install sqlite
If you need other SQL Server else then SQLite, you can follow:
MySQL/MongoDB/CouchDB on RHEL/Centos 6.3
If you don’t need SQL and you installed Python 2.5 or later, you can skip this step for now.
You can install using EPEL repositories any yum (like in the old article I wrote), but I recommend to use the easy_install method from the python-setuptools package, which I’ll show next:
1 2 |
yum install python-setuptools
easy_install django
|
yum install python-setuptools
easy_install django
Test Django by typing python on your command and then:
1 2 |
import django print django.get_version() |
import django
print django.get_version()

As you can see, the RPM version is version 1.5.4, while the current release in the EPEL version is 1.3.1. Internationalization: in template code is not available in 1.3.1 for example but only from Django 1.4
From the command, cd into a directory where you’d like to store your app, then run the following command:
1 2 |
django-admin.py startproject mysite
cd mysite
|
django-admin.py startproject mysite
cd mysite
Note: if you are installing Django using EPEL repos, the command will be django-admin and not django-admin.py.
1 |
python manage.py runserver |
python manage.py runserver

You’ve started the Django development server, a lightweight Web server – easier to startwithout having to deal with configuring a production server — such as Apache — until you’re ready for production.
Browse to http://127.0.0.1:8000/ with your Web browser. You’ll see a “Welcome to Django” page. It worked!

To change port:
1 |
python manage.py runserver 8080
|
python manage.py runserver 8080
If you need to start the server to answer not only locally, use:
1 |
python manage.py runserver 0.0.0.0:8000
|
python manage.py runserver 0.0.0.0:8000
Remember: Apache loads Django environment when starting and keep running it even when source is changed! I suggest you to use Django ‘runserver’ (which automatically restarts on source code changes) in development sessions, unless you need some Apache-specific features.
Edit mysite/settings.py. It’s a normal Python module with module-level variables representing Django settings.
Help here.
To run your Django application inside apache – use either mod_python or mod_wsgi, Support for mod_python will be deprecated in a future release of Django. If you are configuring a new deployment, you are strongly encouraged to consider using mod_wsgi or any of the other supported backends.
For this to work, you must have apache installed and configured.
1 |
yum install mod_python
|
yum install mod_python
you need to configure you apache/VirtualHost to:
    AddHandler mod_python .py
    PythonHandler mod_python.publisher | .py
    AddHandler mod_python .psp .psp_
    PythonHandler mod_python.psp | .psp .psp_
    PythonDebug On</pre>
[/code]


<h3>Testing mod_python</h3>
Create a '<em>test.py'</em> file in your apache server. put inside:
[code lang="py"]<% req.write("Hello World!") %>[/code]

and browse to www.your.server/test.py and you should see the "Hello World!" there.
<h3>Django using mod_python</h3>
Edit your <tt>httpd.conf</tt> file:

[code lang="apache"]
<pre><Location "/mysite/">
    SetHandler python-program
    PythonHandler django.core.handlers.modpython
    SetEnv DJANGO_SETTINGS_MODULE mysite.settings
    PythonOption django.root /mysite
    PythonDebug On
</Location>
Deploying Django with Apache and mod_wsgi is the recommended way to get Django into production.
1 |
yum install mod_wsgi
|
yum install mod_wsgi
to use mod_wsgi, create an apache folder inside your project and create a django.wsgi file:
import os, sys

sys.path.append('/var/www/django')

sys.path.append('/var/www/django/mysite')

os.environ['DJANGO_SETTINGS_MODULE'] = 'mysite.settings'
import django.core.handlers.wsgi
application = django.core.handlers.wsgi.WSGIHandler()
and configure your apache with:
<VirtualHost *:80>
ServerName www.example.com
ServerAlias www.example.com
WSGIScriptAlias / /var/www/django/mysite/apache/django.wsgi
# Alias /robots.txt /var/www/django/mysite/static/robots.txt
# Alias /favicon.ico /var/www/django/mysite/static/favicon.ico
Alias /static/admin/ /usr/lib/python2.6/site-packages/django/contrib/admin/media/
Alias /static/ /var/www/django/mysite/static/
Alias /media/ /var/www/django/mysite/media/
<Directory /var/www/django/mysite>
Order allow,deny
Allow from all
</Directory>
<Directory /var/www/django/mysite/media>
Order deny,allow
Allow from all
</Directory>
<Directory /var/www/django/mysite/static>
Order deny,allow
Allow from all
</Directory>
</VirtualHost>
read more on: multiple django sites with apache & mod_wsgi
You’ve Python / Django installed on your Centos 6.4 and a new project template waiting for you to work on.
* this article is an edited version of an older article.

I started a new project: for learning purposes: to learn python gevent api and to implement a simple server – with Authentication & Websockets.
First thing after handling routings and starting server with the famous ‘hello, world!’ message was to find a suitable Framework, if any.
After a search I found Bottle which I think is amazing microframework. Flask was also great, but I loved the idea of a microframework without template engine so I could choose my own.
As I worked with many Template engines in many different languages and environments (.NET/Ruby/Node.js/Python/PHP/and more). I know I can handle any syntax, so the first thing I’ve looked for is the fastest Python template engine.
I’ve choosed to try Tenjin, It worked great, looked bad. the syntax was messy, there was that .cache file near my.pyhtml files… But it worked great and FAST!
I’ve got to admit that SpitFire catched me, and I’d choose it for several reasons:
But as I ‘m not using Cheetah and the Languages support Tenjin offers – for me It is Winning case for Tenjin.
I decided to try more template engine, slower – but friendly : Jinja2.
Tenjin syntax , which was somewhat ugly, and Jinja2 was just beautirful, and reminds me Django’s and Twig which I like… So, I;ve decided to try Jinja2 and to feel the difference.
Found no problems there, Jinja2 was working great, and the .html files are looking great in compare to Tenjin,.. more readable, no .cache file – and .html instead of .pyhtml. I’ve choosed to stick with Jinja2… for now…..
…meanwhile.. on another project I’m working on in Django, I’ve tried to implement Googles AngularJS and found my self in a very bad situation. the AngluarJS Template Engine was similar to Django’s one! There are several solutions and fixes for this, some are really messy but I fixed it… and I’ve learned a very important lesson… Templates engines used today in both sides: both client & server, and this should be taken into consideration when choosing template engines.
The true title of this article should be: Why I moved from Tenjin to Jinja2 and why I moved from Jinja2 to Tenjin again..
As Jinja is very similar to Django (and angular) I found my self thinking about Tenjin again…
I know it’s not a classical -vs- article which compares between features, and there is a lot to cover in the topic of jinja2 vs tenjin and the feautres of both,.. I choosed to wrote instead on my view and decisions… what made me go back to Tenjin and leave Jinja 2 behind.. This is my story of Jinja2 vs Tenjin… In my case, Tenjin won, but I MUST say that Jinja2 is GREAT!, also: SpitFire, Mako Template, Cheetah, Genshi & others… as always: each tool for different task… It’s your call…
I learned about Jinja2 inheritance feature which is missing in Tenjin. If you need Template Inheritance go for Tenjin (or other).
What do you think? Which Python Template engine do you use? and why?
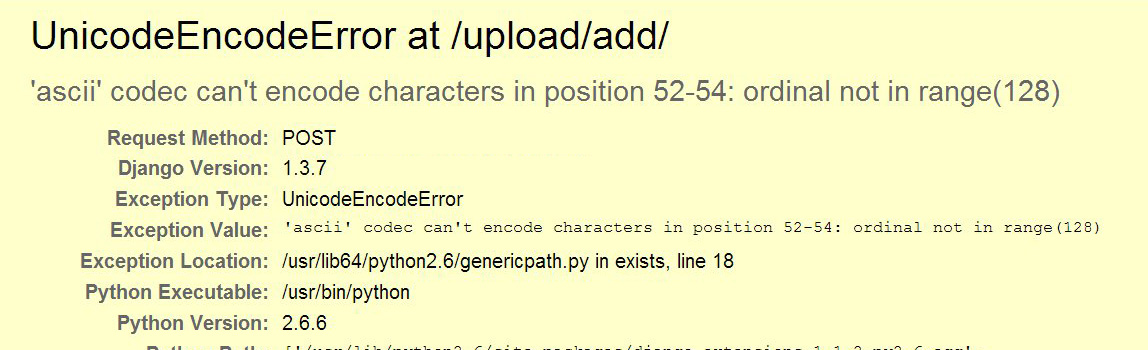
This is a solution for UnicodeEncodeError raised when saving a ‘POST’ in Django form where filename is in different encoding then ‘ASCII’. ( ‘ascii’ codec can’t encode characters in position )
Posting the form raising error in Django:
UnicodeEncodeError at /upload/add/
‘ascii’ codec can’t encode characters in position 52-54: ordinal not in range(128)
UnicodeEncodeError raised when saving a ‘POST’ in Django form where filename is in UTF-8 encoding and converted by Django to ‘ASCII’.
Posting the form raising error in Django:
File “/usr/lib/python2.6/site-packages/django/core/handlers/base.py” in get_response
111. response = callback(request, *callback_args, **callback_kwargs)
File “/usr/lib/python2.6/site-packages/django/views/generic/base.py” in view
47. return self.dispatch(request, *args, **kwargs)
File “/usr/lib/python2.6/site-packages/django/views/generic/base.py” in dispatch
68. return handler(request, *args, **kwargs)
File “/usr/lib/python2.6/site-packages/django/views/generic/edit.py” in post
138. return self.form_valid(form)
File “/var/www/websites/mysite/fileupload/views.py” in form_valid
54. obj.save()
File “/var/www/websites/mysite/fileupload/models.py” in save
25. super(Picture, self).save(*args, **kwargs)
File “/usr/lib/python2.6/site-packages/django/db/models/base.py” in save
460. self.save_base(using=using, force_insert=force_insert, force_update=force_update)
File “/usr/lib/python2.6/site-packages/django/db/models/base.py” in save_base
543. for f in meta.local_fields if not isinstance(f, AutoField)]
File “/usr/lib/python2.6/site-packages/django/db/models/fields/files.py” in pre_save
255. file.save(file.name, file, save=False)
File “/usr/lib/python2.6/site-packages/django/db/models/fields/files.py” in save
92. self.name = self.storage.save(name, content)
File “/usr/lib/python2.6/site-packages/django/core/files/storage.py” in save
48. name = self.get_available_name(name)
File “/usr/lib/python2.6/site-packages/django/core/files/storage.py” in get_available_name
74. while self.exists(name):
File “/usr/lib/python2.6/site-packages/django/core/files/storage.py” in exists
218. return os.path.exists(self.path(name))
File “/usr/lib64/python2.6/genericpath.py” in exists
18. st = os.stat(path)
Exception Type: UnicodeEncodeError at /upload/add/
Exception Value: ‘ascii’ codec can’t encode characters in position 52-54: ordinal not in range(128)
In the model I have:
file = models.ImageField(upload_to=”pictures”)
the error raised on the line in the view.py:
obj.save()
Ticket #11030 is talking about this error.
Reverted a change that assumed the file system encoding was utf8, and changed a test to demonstrate how that assumption corrupted uploaded non-ASCII file names on systems that don’t use utf8 as their file system encoding (Windows for one, specifically).
Some servers do not have the necessary files to allow successfully setting the locale to one that supports utf-8 encoding. See here.
The meaning of this is that Django assumes the file system is non UTF-8 and validates that the filename is ASCII. The error raised when the file name is in UTF-8.
The problem may be in different places. We need to search for the problem:
from here:
Django is passing a unicode string “path” to the os.stat() function. On many operating systems, Python must actually pass a bytestring, not unicode, to the underlying OS routine that implements “stat”. Therefore Python must convert the unicode string to a bytestring using some encoding. The encoding it uses is whatever is returned by os.getfilesystemencoding
To get the system encoding using the sys.getfilesystemencoding(), enter python at bash and then:
import sys
sys.getfilesystemencoding()
If the output is:
‘UTF-8’
You don’t have problem with your system encoding.
If the problem is here, and you get back ‘ASCII’, change it according to your system.
Check the locale Object (again in python shell)
import locale
locale.getdefaultlocale()
Again, if the output is: (‘en_US’, ‘UTF8’) – the problem is not here. if it is – change it according to your system.
If the system is ok, then probably the problem is with you web server (Apache, Nginx, etc)
Are you using apache? mod_wsgi? Maybe the problem is here.
To see locale on your centos type at bash:
locale
You should see something like this:
# locale
LANG=en_US.UTF-8
LC_CTYPE=”en_US.UTF-8″
LC_NUMERIC=”en_US.UTF-8″
LC_TIME=”en_US.UTF-8″
LC_COLLATE=”en_US.UTF-8″
LC_MONETARY=”en_US.UTF-8″
LC_MESSAGES=”en_US.UTF-8″
LC_PAPER=”en_US.UTF-8″
LC_NAME=”en_US.UTF-8″
LC_ADDRESS=”en_US.UTF-8″
LC_TELEPHONE=”en_US.UTF-8″
LC_MEASUREMENT=”en_US.UTF-8″
LC_IDENTIFICATION=”en_US.UTF-8″
LC_ALL=en_US.UTF-8
if you see:
LC_ALL=
then probable using this python script:
import locale
locale.getlocale()
will return (None, None)
type for all available locale:
locale -a
Unfortunately LANG is often set incorrectly when running under Apache. Documenting the need to set LANG properly under Apache is the subject of #10426,
In [11170] Added note on language variables required for Apache to survive non-ASCII file uploads:
If you get a UnicodeEncodeError
===============================If you’re taking advantage of the internationalization features of Django (see
:ref:`topics-i18n`) and you intend to allow users to upload files, you must
ensure that the environment used to start Apache is configured to accept
non-ASCII file names. If your environment is not correctly configured, you
will trigger “UnicodeEncodeError“ exceptions when calling functions like
“os.path()“ on filenames that contain non-ASCII characters.To avoid these problems, the environment used to start Apache should contain
settings analogous to the following::export LANG=’en_US.UTF-8′
export LC_ALL=’en_US.UTF-8′Consult the documentation for your operating system for the appropriate syntax
and location to put these configuration items; “/etc/apache2/envvars“ is a
common location on Unix platforms. Once you have added these statements
to your environment, restart Apache.
Check your Django app settings.py to see if I18N is enabled:
USE_I18N = True
Create view:
import locale import sys def view_locale(request): loc_info = "getlocale: " + str(locale.getlocale()) + \ "<br/>getdefaultlocale(): " + str(locale.getdefaultlocale()) + \ "<br/>fs_encoding: " + str(sys.getfilesystemencoding()) + \ "<br/>sys default encoding: " + str(sys.getdefaultencoding()) "<br/>sys default encoding: " + str(sys.getdefaultencoding()) return HttpResponse(loc_info)
and also create a url pattern:
url(r’^locale/$’, ‘myapp.views.view_locale’),
Browse to ‘yoursite.com/locale‘, to check for problems:
getlocale: (None, None)
getdefaultlocale(): (None, None)
fs_encoding: ANSI_X3.4-1968
sys default encoding: ascii
If the view return something like the above, and everything we checked is ok until now, It’s mean that maybe the problem is with your web-server (apache, nginx, etc.):
non-ascii filenames with the Django storage system with the default apache settings on most systems will trigger UnicodeEncodeError exceptions when calling functions like os.path(). To avoid these issues, ensure that the following lines are included in your apache envvars file (typically found in /etc/apache2/envvars).
export LANG='en_US.UTF-8' export LC_ALL='en_US.UTF-8'
To see your active envvars use:
printenv
This error likely wont rear its head during development on the test server as, when run from the command line, the ./manage.py script inherits the users language and locale settings.
Consult the documentation for your operating system for the appropriate syntax and location to put these configuration items; /etc/apache2/envvars is a common location on Unix platforms (Not all Apache distributions have a envvars file). Once you have added these statements to your environment, restart Apache.
if the ‘envvars’ file doesn’t exist. In that case you will need
to modify the environment of the startup script which is used to
startup Apache in the first place. I believe that for most Linux
systems this can be done by modifying:
/etc/sysconfig/httpd
or
/etc/init.d/httpd
or
/etc/init.d/apache
depending on the distro.
If everything fine, when you’ll add those lines and restart the httpd (apache) server you should get at the /locale view:
getlocale: (‘en_US’, ‘UTF8’)
getdefaultlocale(): (‘en_US’, ‘UTF8’)
fs_encoding: UTF-8
sys default encoding: utf-8
And your app should work now!
Some had also add the lines to ~/.bashrc or to the .htaccess, but I haven’t tested it.
I tried to add the LANG and LC_ALL to the .wsgi instead (from some instructions) and failed becuase:
Some are adding the LANG & LC_ALL to the .WSGI loading script:
os.environ['LANG']='en_US.UTF-8' os.environ['LC_ALL']='en_US.UTF-8'
Using the view we created earlier (if you had problem) you can see now that
getdefaultlocale(): (‘en_US’, ‘UTF8’).
But the others function may still return ASCII values:
getlocale: (None, None)
getdefaultlocale(): (‘en_US’, ‘UTF8’)
fs_encoding: ANSI_X3.4-1968
sys default encoding: ascii
adding:
import sys
reload(sys)
sys.setdefaultencoding('utf-8')
And now you can see that the sys default encoding is: UTF-8.
reload is important This is python 2.x problem, not the django.
BUT
as you can see:
1 | (sys.getfilesystemencoding() |
(sys.getfilesystemencoding()
return:
ANSI_X3.4-1968
and that is the problem we have. Django doesn’t recognize the filesystem as UTF-8
SetEnv directive does not modify process environment variables, except
for CGI scripts spawned from Apache. In Apache/mod_wsgi they only
affect the per request WSGI environment.
Setting them in the WSGI script file also will have no affect, as
Python works out the default encoding when the interpreter is first
initialised, which means that doing it in the script file is too late.
What this is mean that you should insert export the LANG and LC_ALL earlier.
Check the httpd.conf for:
AddDefaultCharset
The problem may be there.
You can try to set it to
AddDefaultCharset UTF-8
or to off:
AddDefaultCharset Off
If you have nginx installed, Add
1 | charset utf-8; |
line in
1 | http |
section in main Nginx config file (
1 | /etc/nginx/nginx.conf |
) or in section
1 | server |
in your virtual server config file.
Read more about Nginx HttpCharsetModule.
So, you’ve fixed the app.. now you can upload non ascii files but the Django admin return UnicodeEncodeError when you try to view the row in the admin panel?
Just fix your model __UNICODE__ function to return unicode (u”):
1 2 | def __unicode__(self): return u'%s' % (self.file) |
def __unicode__(self): return u'%s' % (self.file)
in this article: Python vs PyPy I’ll explain how-to install both compilers (Python (CPython) and PyPy) on CentOS and the difference between them.
The Download section of the Python official website (python.org) include list of several Alternative Implementations for python complier. some of them for Linux, some for Windows (.NET) and others.
I am going to review the default Python compiler vs PyPy on my CentOS 6.x machine.
![]()
yum install python
From Official website:
Python is a programming language that lets you work more quickly and integrate your systems more effectively. You can learn to use Python and see almost immediate gains in productivity and lower maintenance costs.
Python (nicknamed CPython) is the default Python Compiler you get with you installing Python.
Create a file named ‘example.py‘ and fill it with:
print 'Hello, world!'
and type on bash:
python example.py
Note: you can also insert the following line as the first line in your .py file and then chmod +x this file to execute it as script:
#!/usr/lib/env python
print “Hello, world!”
and then on bash:
chmod +x example.py
and you can run the script (code) using:
./example.py
![]()
A fast python implementation with a JIT compiler (generate native code on the fly) written in RPython and currently translated partly to C.
Arguments against PyPy compiled in Python are everywhere, but when C compiler gcc is implemented in C, is there any reason for the Python compiler to not be written in Python?
From Wikipedia:
PyPy is a Python interpreter and just-in-time compiler. PyPy focuses on speed, efficiency and compatibility with the original CPython interpreter.[1]
PyPy started out as a Python interpreter written in the Python language itself. Current PyPy versions are translated from RPython to C code and compiled. The PyPy JIT compiler is capable of turning Python code into machine code at run time.
The mission of PyPy is:
We aim to provide:
- a common translation and support framework for producing implementations of dynamic languages, emphasizing a clean separation between language specification and implementation aspects. We call this the RPython toolchain.
- a compliant, flexible and fast implementation of the Python Language which uses the above toolchain to enable new advanced high-level features without having to encode the low-level details. We call this PyPy.
By separating concerns in this way, our implementation of Python – and other dynamic languages – is able to automatically generate a Just-in-Time compiler for any dynamic language. It also allows a mix-and-match approach to implementation decisions, including many that have historically been outside of a user’s control, such as target platform, memory and threading models, garbage collection strategies, and optimizations applied, including whether or not to have a JIT in the first place.
How can it possibly beat CPython?
Manual memory management (which is what CPython does with its counting) can be slower than automatic management in some cases.
Limitations in the implementation of the CPython interpreter preclude certain optimisations that PyPy can do (eg. fine grained locks).
The JIT. Being able to on the fly confirm the type of an object can save you the need to do multiple pointer dereferences to finally arrive at the method you want to call.
yum install pypy
To use pypy instead of your default CPython compiler you need to run your .py file with the pypy compiler.
to use pypy compiler you type at bash:
and type on bash:
pypy myapp.py
Python compiler (CPython) is the default and probably the safe choice so most python applications and modules will work; where PyPy can break some.
You should play with them both. Install them both on your CentOS and test / benchmark your applications using both compilers.
PyPy can rebust your web applcations (or any other code).
For example, Django app can be run on top of PyPy, with drawbacks.
gevent CentOS 6.x Installation Guide
install python-setuptools (for easy_install)
yum install python-setuptools
Install greenlet:
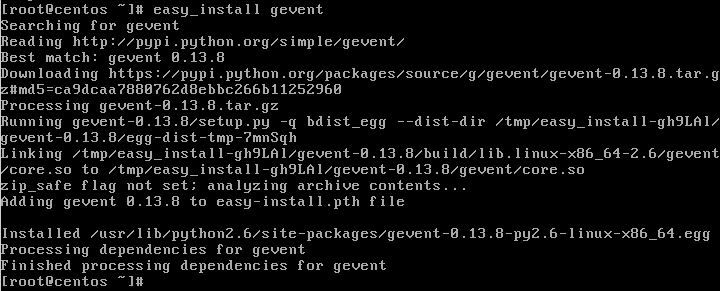
easy_install greenlet
There are several ways to install gevent:
easy as:
easy_install gevent
You need wget to download source:
yum install wget
Now, installing gevent: (Check here for the latest package)
cd /tmp wget http://pypi.python.org/packages/source/g/gevent/gevent-0.13.8.tar.gz tar -xvzf gevent-0.13.8.tar.gz cd gevent-0.13.8 python setup.py install
U may need to add –no-check-certificate to the wget if something is wrong.
You can also install gevent from github using pip.
to test simply run in bash:
python
and then:
import gevent
if no error found, you have installed it correctly 
Example taken from the community documentation:
1 2 3 4 5 6 7 8 9 10 11 12 13 14 | from gevent.wsgi import WSGIServer def application(environ, start_response): status = '200 OK' body = '<p>Hello World</p>' headers = [ ('Content-Type', 'text/html') ] start_response(status, headers) return [body] WSGIServer(('', 8000), application).serve_forever() |
from gevent.wsgi import WSGIServer
def application(environ, start_response):
status = '200 OK'
body = '<p>Hello World</p>'
headers = [
('Content-Type', 'text/html')
]
start_response(status, headers)
return [body]
WSGIServer(('', 8000), application).serve_forever()copy the example into a file (server.py for ex), and start the server by:
python server.py
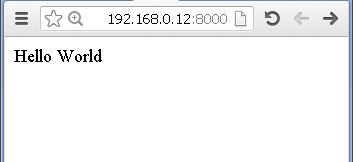
and that’s it! browse to the machine on port 8000 using something like this:
http://[ip of the machine]:8000
In production you can host your gevent after several WSGI server racks like: Gunicorn, Circus, Meinheld, uWSGI, etc..
Gunicorn is the most common WSGI server to host gevent applications. one benchmark shows that Circus is faster then Gunicorn. other tested uWSGI vs Gunicorn and found that uWSGI is faster.
recommend you run them behind a reverse proxy such as nginx. Additional advantages of running them behind a reverse proxy include improved handling of slow clients and bad HTTP requests
You need socketio? you may want to install it:
easy_install gevent-socketio
You can use a python web framework on top of gevent.

yum install python-tornado
I’ve copied the hello world sample from Tornado documentation:
Create a new file called ‘hello.py‘ (or any other name) and fill it with:
1 2 3 4 5 6 7 8 9 10 11 12 13 | import tornado.ioloop import tornado.web class MainHandler(tornado.web.RequestHandler): def get(self): self.write("Hello, world") application = tornado.web.Application([ (r"/", MainHandler), ]) if __name__ == "__main__": application.listen(8888) tornado.ioloop.IOLoop.instance().start() |
import tornado.ioloop
import tornado.web
class MainHandler(tornado.web.RequestHandler):
   def get(self):
      self.write("Hello, world")

application = tornado.web.Application([
   (r"/", MainHandler),
])

if __name__ == "__main__":
   application.listen(8888)
tornado.ioloop.IOLoop.instance().start()Now start your server with simply typing at bash:
1 | python hello.py |
python hello.py
Now you can visit ‘127.0.0.1:8888‘ to watch your hello world first torando app.
It should return the ‘Hello, world‘ output into your browser.
Good implementation of your server would be behind nginx server, where you can run multiple instances of your app on different port and serve them all throw port 80 using nginx load balancer.
http://www.tornadoweb.org/en/latest/overview.html#running-tornado-in-production
After you know how to start a torando server, you can jump into the documentation and learn how-to build your first Torando server!
NOTE: This article was rewritten for CentOS 6.4. please read the updated post.
So you want your first django centos based web site? This is quite easy to install and configure. I’ll cover how to install Python/Django on your centos.
![]()
“Python is a general-purpose, high-level programming language whose design philosophy emphasizes code readability. Its syntax is said to be clear and expressive.” from Wikipedia.
Visit http://www.python.org/
“Django is a high-level Python Web framework that encourages rapid development and clean, pragmatic design.” from https://www.djangoproject.com/
![]()
you may need the EPEL repositories for Centos.
1 2 3 4 |
cd /opt/ wget http://mirrors.nl.eu.kernel.org/fedora-epel/6/i386/epel-release-6-8.noarch.rpm rpm -Uvh epel-release-6-8.noarch.rpm rm epel-release-6-8.noarch.rpm -f |
cd /opt/
wget http://mirrors.nl.eu.kernel.org/fedora-epel/6/i386/epel-release-6-8.noarch.rpm
rpm -Uvh epel-release-6-8.noarch.rpm
rm epel-release-6-8.noarch.rpm -f
Simple as:
1 |
yum install python
|
yum install python
test python by typing: “python” and you should see something similar to:
As for this time being of writing (June 18 2012), the version of python@EPEL is 2.6.6
Django works with any Python version from 2.6.5 to 2.7. It also features experimental support for versions 3.2 and 3.3. All these versions of Python include a lightweight database called SQLite so you won’t need to set up a database just yet unless you need other SQL
If you need other SQL Server else then SQLite, you can follow:
MySQL/MongoDB/CouchDB on RHEL/Centos 6.3
If you don’t need SQL and you installed Python 2.5 or later, you can skip this step for now.
1 |
yum install Django
|
yum install Django
Test Django by typing python on your command and then:
1 2 |
import django print django.get_version() |
import django
print django.get_version()

As you can see, the RPM version is version 1.3.1, while the current release version is 1.4.1. while you are not too far behind using EPEL, you won’t get to play with the last options. Internationalization: in template code is not available in 1.3.1 for example but only from Django 1.4
From the command, cd into a directory where you’d like to store your app, then run the following command:
1 2 |
django-admin startproject mysite
cd mysite
|
django-admin startproject mysite
cd mysite
1 |
python manage.py runserver |
python manage.py runserver
You’ve started the Django development server, a lightweight Web server – easier to startwithout having to deal with configuring a production server — such as Apache — until you’re ready for production.
Browse to http://127.0.0.1:8000/ with your Web browser. You’ll see a “Welcome to Django” page. It worked!
To change port:
1 |
python manage.py runserver 8080
|
python manage.py runserver 8080
If you need to start the server to answer not only locally, use:
1 |
python manage.py runserver 0.0.0.0:8000
|
python manage.py runserver 0.0.0.0:8000
Remember: Apache loads Django environment when starting and keep running it even when source is changed! I suggest you to use Django ‘runserver’ (which automatically restarts on source code changes) in development sessions, unless you need some Apache-specific features.
Edit mysite/settings.py. It’s a normal Python module with module-level variables representing Django settings.
Help here.
To run your Django application inside apache – use either mod_python or mod_wsgi, Support for mod_python will be deprecated in a future release of Django. If you are configuring a new deployment, you are strongly encouraged to consider using mod_wsgi or any of the other supported backends.
For this to work, you must have apache installed and configured.
1 |
yum install mod_python
|
yum install mod_python
you need to configure you apache/VirtualHost to:
    AddHandler mod_python .py
    PythonHandler mod_python.publisher | .py
    AddHandler mod_python .psp .psp_
    PythonHandler mod_python.psp | .psp .psp_
    PythonDebug On</pre>
[/code]


<h3>Testing mod_python</h3>
Create a '<em>test.py'</em> file in your apache server. put inside:
[code lang="py"]<% req.write("Hello World!") %>[/code]

and browse to www.your.server/test.py and you should see the "Hello World!" there.
<h3>Django using mod_python</h3>
Edit your <tt>httpd.conf</tt> file:

[code lang="apache"]
<pre><Location "/mysite/">
    SetHandler python-program
    PythonHandler django.core.handlers.modpython
    SetEnv DJANGO_SETTINGS_MODULE mysite.settings
    PythonOption django.root /mysite
    PythonDebug On
</Location>
Deploying Django with Apache and mod_wsgi is the recommended way to get Django into production.
1 |
yum install mod_wsgi
|
yum install mod_wsgi
to use mod_wsgi, create an apache folder inside your project and create a django.wsgi file:
import os, sys

sys.path.append('/var/www/django')

sys.path.append('/var/www/django/mysite')

os.environ['DJANGO_SETTINGS_MODULE'] = 'mysite.settings'
import django.core.handlers.wsgi
application = django.core.handlers.wsgi.WSGIHandler()
and configure your apache with:
<VirtualHost *:80>
ServerName www.example.com
ServerAlias www.example.com
WSGIScriptAlias / /var/www/django/mysite/apache/django.wsgi
# Alias /robots.txt /var/www/django/mysite/static/robots.txt
# Alias /favicon.ico /var/www/django/mysite/static/favicon.ico
Alias /static/admin/ /usr/lib/python2.6/site-packages/django/contrib/admin/media/
Alias /static/ /var/www/django/mysite/static/
Alias /media/ /var/www/django/mysite/media/
<Directory /var/www/django/mysite>
Order allow,deny
Allow from all
</Directory>
<Directory /var/www/django/mysite/media>
Order deny,allow
Allow from all
</Directory>
<Directory /var/www/django/mysite/static>
Order deny,allow
Allow from all
</Directory>
</VirtualHost>
read more on: multiple django sites with apache & mod_wsgi
You’ve Python / Django installed on your Centos 6.3 and a new project template waiting for you to work on.
* this article is an edited version of an older article.
Python based web applications can be served in several ways. You can use the old and good CGI interface, or use the more common used mod_python. FastCGI and SCGI are also an option. but most of those ways supports the WSGI interface which is the recommended way. You can learn more about each way, and the cons and pros of each, and what is wsgi in this great tutorial/article: How to use python in the web.
We’ll build a skeleton for a Python based WSGI web application hosted on Apache HTTPd. I’ve choosed WSGI over other methods to promote web application portability across a variety of web servers.
red-hat/fedora/centos: install mod_wsgi using:
yum install mod_wsgi
debain/ubuntu: install mod_wsgi using:
apt-get install mod_wsgi
configure your httpd with:
1 2 3 4 5 | WSGIScriptAlias /myapp /var/www/myapp/myapp.wsgi <Directory /var/www/myapp> Order allow,deny Allow from all </Directory> |
WSGIScriptAlias /myapp /var/www/myapp/myapp.wsgi
<Directory /var/www/myapp>
   Order allow,deny
   Allow from all
</Directory>
Create the file myapp.wsgi at ‘/var/www/myapp’ and fill it with the example from mod_wsgi documentation:
1 2 3 4 5 6 7 8 9 | def application(environ, start_response): status = '200 OK' output = 'Hello World!' response_headers = [('Content-type', 'text/plain'), ('Content-Length', str(len(output)))] start_response(status, response_headers) return [output] |
def application(environ, start_response):
    status = '200 OK'
    output = 'Hello World!'

    response_headers = [('Content-type', 'text/plain'),
                        ('Content-Length', str(len(output)))]
    start_response(status, response_headers)

return [output]You may need to restart your apache using: service httpd restart.
Now use your browser to see the ‘Hello World’ response from your first wsgi server.

Happy wsgi python-ing…!
Django, out-of-the-box doesn’t knows how to add rows to your db when the model changed, You have 2 options:
![]()
You may need the EPEL repositories for Centos.