Contents
VirtualEnv Tutorial Overview
Virtualenv tutorial. In this tutorial I will show you in easy steps how to install and use VirtualEnv & VirtualEnvWrapper on your CentOS 6.x environment.
Install Python
1 |
yum install python
|
yum install python
test python by typing: “python” and you should see something similar to:

Install Easy_Install
yum install python-setuptools
Install PIP
METHOD A: RECOMMENDED : Using Easy_Install
easy_install install pip
that’s it!
METHOD B: You also can install PIP using yum but it’s not recommended.
yum install python-pip
Please note that name of the command is pyton-pip under RHEL and friends. I recommend that you add the following alias to your ~/.bashrc file, enter:
echo 'alias pip="/usr/bin/pip-python"' >> $HOME/.bashrc

. $HOME/.bashrc
Reload your startup file (e.g. source .zshrc) and you’re ready to go.
VirtualEnv Tutorial
VirtualEnv Tutorial can only start with installation….
Install VirtualEnv
The first step on our virtualenv tutorial is to Install VirtualEnv
pip install virtualenv
Basic commands
before we’ll continue to VirtualEnvWrapper lets play a liitle with VirtualEnv:
Create new Virtual Environment
virtualenv myenv
the above command will create a new ‘myenv’ directory and will install easy_install and pip to that directory.

virtualenv tutorial
Activate your new environment
Before you can install any Python module into your virtual environment you need to activate it using:
. bin/activate

virtualenv tutorial
you can see now the command display your virtualenv name in left of the bash shell inside brackets (myenv).
Install something
Maybe Django?
pip install django

You can see inside the myenv/lib/python2.6/site-packages you will find the django framework egg.
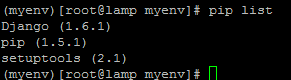
Use the pip list command to see installed packages:
pip list
Requirement file (requirement.txt)
You can create a requirement file which will help you download & install all the necessary libraries when you deploy or git clone your application elsewhere later.
to create a requirements file from a virtualenv setup (freeze):
pip freeze -l > requirements.txt
-l = If in a virtualenv that has global access, do not output globally-installed packages.
installing from a requirements file:
pip install -r requirements.txt
Deactivate
to leave the virtual environment use the command:
deactivate
![]()
notice that you are not connected to (myenv) anymore.
Delete
To delete a virtual environment just delete its folder:
rm -rf myenv
VirtualEnvWrapper
we’ve finished with the virtualenv tutorial basics. so,… you want more?
virtualenvwrapper is a set of extensions to virtualenv. The extensions include wrappers for creating and deleting virtual environments and otherwise managing your development workflow, making it easier to work on more than one project at a time without introducing conflicts in their dependencies.
Features
- Organizes all of your virtual environments in one place.
- Wrappers for managing your virtual environments (create, delete, copy).
- Use a single command to switch between environments.
- Tab completion for commands that take a virtual environment as argument.
- User-configurable hooks for all operations (see Per-User Customization).
- Plugin system for more creating sharable extensions (see Extending Virtualenvwrapper).
Install VirtualEnvWrapper
(Make sure you deactivated from your virtualenv before continue)
pip install virtualenvwrapper

Set up virtualenvwrapper
Virtualenvwrapper needs initialize it’s settings to work properly:
export WORKON_HOME=~/Envs
mkdir -p $WORKON_HOME
source /usr/local/bin/virtualenvwrapper.sh
Notes:
- The default for WORKON_HOME is “.virtualenvs”. if you missing this line it will be set auto to default when running virtualenvwrapper.sh. I’ve changed it so you could see how it impacts.
- The third command creates new files inside your new ~/Envs (WORKON_HOME) folder.
also, - You will want to add the command to source /usr/local/bin/virtualenvwrapper.sh to your shell startup file (~/bash_profile)
If the file virtualenvwrapper.sh is not there change the path depending on where it was installed by pip. whereis command can help you if you can’t find it:
whereis virtualenvwrapper.sh
…and that’s it! Now you’re all set to start using virtual environments!
Create First Environment
To create your first virtual environment type:
1 |
mkvirtualenv myenv |
mkvirtualenv myenv

the command created a new ~/Envs/myenv folder with 4 folders inside (bin, include, lib and lib64 which is actually a symlink)
Note: as in Virtualenv. you can see that after the mkvirtualenv command you’ve entered the virtualenv automatically (myenv).
Exit
like in VirtualEnv – to exit virtual environment type:
deactivate
Workon
but now to work on your virtual environment again use:
workon myenv
you don’t need to cd into the folder and use the ./bin/activate command anymore. It’s working wherever you are on your filesystem.
The workon command also includes tab completion for the environment names.
Using PIP with VirtualEnvWrapper
as in VirtualEnv – to install packages to local environment use (for Example Django):
pip install Django
We can see the new package with lssitepackages:

you can see the Django is here…
Requirements
you can also use the requirements.txt file you created earilier here (If you still have it) and use the
pip install -r requirements.txt
command to install all the packages here.
Delete
If you want to delete your environment just use:
rmvirtualenv myenv
If you connected to this virtualenv you must deactivate first.
Customization scripts
When you type the workon command it invokes customization scripts as an environment is activated or deactivated (see Per-User Customization).
this simple example script from the readthedocs of VirtualEnvWrapper changes the folder for you when you workon:
(env1)$ echo 'cd $VIRTUAL_ENV' >> $WORKON_HOME/postactivate
(env1)$ workon env2
(env2)$ pwd
/Users/dhellmann/Envs/env2
or why not install something for us when we create a new virtual environment?
$ echo 'pip install sphinx' >> $WORKON_HOME/postmkvirtualenv
Project Manangement
If you want your project files to be in other location and your virtualenvs in other you can set the
export PROJECT_HOME=$HOME/MyProjects
and use the mkproject command to create both empty folder at your PROJECT_HOME and virtualenv at your WORKON_HOME
This is great feature! you don’t need to see the virtualenv folders at your project folder and you can save your requirment.txt file at the project.
Appendix: Virtualenv & Git
read this great script which helps you activate your virtualenv whenever you enter your git folder.
.Gitignore
For starter – you can find here a full python .gitignore for your new project.
Good luck!
Development Specialist, Artist and Activist
Personal Website
Don’t forget to unalias pip when you want to use another environment.
$ unalias pip