Tag Archives: CentOS

LuaJIT

CentOS LuaJIT Installation instructions

centos luajit installation instructions

centos luajit

centos luajit installation instructions – In the following tutorial I will show you how to install and use the LuaJIT Compiler on your CentOS box.

Before you continue you should already know what is Lua and JIT Compiler.


What is LuaJIT?

LuaJIT is a Just-In-Time Compiler (JIT) for the Lua programming language.

LuaJIT has been successfully used as a scripting middleware in games, appliances, network and graphics apps, numerical simulations, trading platforms and many other specialty applications. It scales from embedded devices, smartphones, desktops up to server farms. It combines high flexibility with high performance and an unmatched low memory footprint.

LuaJIT has been in continuous development since 2005. It’s widely considered to be one of the fastest dynamic language implementations. It has outperformed other dynamic languages on many cross-language benchmarks since its first release — often by a substantial margin.

LuaJIT is Copyright © 2005-2014 Mike Pall, released under the MIT open source license.

from LuaJIT website


Prerequisities

you need to install a package for GCC before compiling LuaJIT, you can do that by:

yum install gcc

or better, install the development tools:

yum groupinstall “Development Tools”


centos luajit installation instructions

Check the LuaJIT download page to check if newer version available. The next insructions are for the latest stable version currently available – LuaJIT-2.0.2

cd /opt
wget http://luajit.org/download/LuaJIT-2.0.2.tar.gz
tar -zxvf LuaJIT-2.0.2.tar.gz
cd LuaJIT-2.0.2
make && make install
# or sudo make install if you are not 'root'

Option 2: using git

OPTIONALLY, you can install LuaJIT using GIT. choose this method only if you want to be updated with the latests patches and updates and your don’t care about the risk of bugs. (NOT FOR PRODUCTION) 

cd /opt
git clone http://luajit.org/git/luajit-2.0.git
cd luajit-2.0
make && make install 
# or sudo make install if you are not 'root'
centos luajit

centos luajit

Running LuaJIT

That’s it. you have luajit installed.

consider the file ‘test.lua’:

print ("Hello, world!")

You can run (interpret) the file using

luajit test.lua

Save bytecode to test.out

luajit -b test.lua test.out
luajit test.out

more information about running luajit here.


That’s it! you have centos luajit installed.

Cheers!.

VMWare Workstation start on boot CentOS

CentOS Gunicorn installation instructions for newbies

centos gunicorn installation instructions

centos gunicorn

centos gunicorn : In this simple tutorial I’ll explain how to install and run Gunicorn python server on your CentOS machine.

This tutorial is meant for Centos 6.4 and above but it should work on any CentOS 6.x release.


What is gunicorn?

From: Gunicorn – Python WSGI HTTP Server for UNIX:

Gunicorn ‘Green Unicorn’ is a Python WSGI HTTP Server for UNIX. It’s a pre-fork worker model ported from Ruby’s Unicorn project. The Gunicorn server is broadly compatible with various web frameworks, simply implemented, light on server resources, and fairly speedy.


Installation

Python

before you going to install the centos gunicorn server you need to insure you have the python interperter installed (it should be, as it’s installed by default on the latest CentOS releases). to check that you have python use the command:

python

command not found of course means you need to install python now.


Install python

first make sure your have python installed. Simple as:

yum install python

test python by typing: “python” and you should see something similar to:

python

(Ctrl+D to exit)


Gunicorn

Next we need to install gunicorn. for this we have (as always) several choices.

1) Using YUM. I personally don’t recommend it. I know some are happy to use the system packaging management wherever possible, but as for python I don’t think it’s the way to go.

To install gunicorn using yum:

yum install python-gunicorn

2) Using easy_install. using easy_install is a better choice for my taste to install python packages. this is how you install gunicorn using easy_install, but I recommend installing gunicorn using PIP as I will show next…

yum install python-setuptools
easy_install gunicorn

3) Using PIP: This is my RECOMMENDED way of installing gunicorn. to install PIP you actually need easy_install so the commands are:

yum install python-setuptools
easy_install pip
pip install gunicorn

Virtualenv

I can’t recommend enough to start working with virtualenv from beginning. At some point in the future, if you are going to consist with python coding, you are going to use the ‘pip update’ command to update some or all your libraries and then expect your python application to stop working.

Python libraries, as any open source library, have the freedom to sacrifice backward compatibility for new features, performance or redesign.

Virtualenv is a python virtual environment tool to ensure that your python applications will work as expected as long you don’t deliberately update some or all of the dependency libraries for that virtual environment specifically.

To install virtualenv (and virtualenvwrapper) and learn the basics read this tutorial. then create your virtual environment and install gunicorn to that environment.

# after you've install pip, virtualenv and virtualenvwrapper
mkproject myapp
workon myapp
pip install gunicorn


Running Gunicorn

Basic usage:

$ gunicorn [OPTIONS] APP_MODULE

so for the following myapp.py file:

# -*- coding: utf-8 -

def app(environ, start_response):
    data = 'Hello, World!\n'
    status = '200 OK'
    response_headers = [
        ('Content-type','text/plain'),
        ('Content-Length', str(len(data)))
    ]
    start_response(status, response_headers)
    return iter([data])

just run:

gunicorn -w 4 myapp:app
# Sample output
[INFO] Arbiter booted
[INFO] Listening at: http://127.0.0.1:8000
[INFO] Worker spawned (pid: 16801)
[INFO] Worker spawned (pid: 16802)
[INFO] Worker spawned (pid: 16803)
[INFO] Worker spawned (pid: 16804)
centos gunicorn

centos gunicorn

This command starts gunicorn with 4 workers on port 8000. feel free to experiment and customize the command with additional parameters.

There also command line for using Django <1.4 and Paster. read more here.

Read more about configuring Gunicorn and configuration files.


Deploying Gunicorn

on deployment, It’s strongly recommended to use Gunicorn behind a proxy server.

nginx

I personally prefer nginx but it’s not your only choice.

If you want to install nginx on your CentOS machine follow this installation instructions.
use this script (at github) to configure your nginx to pass request to the gunicorn process


Monitoring and Logging

Usally you’d want the gunicorn to be run in the background, load on boot and restart on errors. you want also the ability to monitor that process.

There are several tools for that.job, including: Supervisord, Gafferd, runit and many more…  choose what fits you best. here you have examples for monitoring gunicorn using those tools.


That it. enjoy playing with your centos gunicorn setup.


cento tomcat

CentOS Tomcat server installation is easy!

CentOS Tomcat installation

CentOS Tomcat

centos tomcat

“Apache Tomcat is an open source software implementation of the Java Servlet and JavaServer Pages technologies. The Java Servlet and JavaServer Pages specifications are developed under the Java Community Process.” from Tomcat homepage.


Prerequisities

  • CentOS 6.x (I haven’t tested this on older versions but it should probably work as well) 

Check your Java installation

before we’ll continue the installation of Tomcat, the JDK (Java Development Kit) should be installed on your CentOS machine. to check for Java support use the command:

java -version

javanotfound

if bash returns ‘command not found‘ then continue to the next step and install the JDK, else skip the step and continue to Tomcat server installation.


Install Java Development Kit (JDK)

To install the jdk we have 2 options:

  1. Install OpenJDK – Using YUM.
  2. Install Oracle JDK – Install manually.

I’ll explore both:

Option 1: Install Open-JDK using YUM

For beginners and testing purposes you should go with this option.

Why should I use the Oracle JDK over the OpenJDK, or vice-versa? [closed]

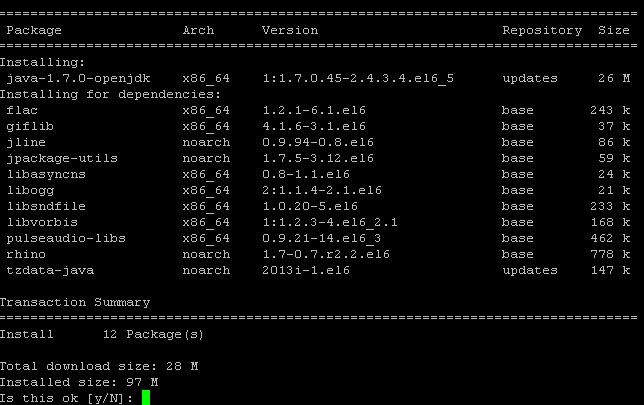
The command to install JDK using YUM is very simple:

yum install java
yuminstall java

  • Note: use sudo if you are not logged-in with root.
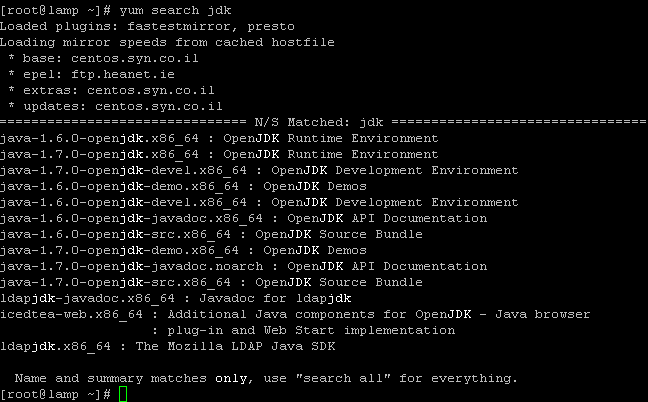
  • the command will install the latest jdk (1.7 as for this date). If you want to install older version use the full name (search using: $ yum search jdk)yum-search-jdk
    You can see you can install the 1.6 version by typing: yum install java-1.6.0

Check you have installed it right:

javafound


Option 2: Install JDK manually

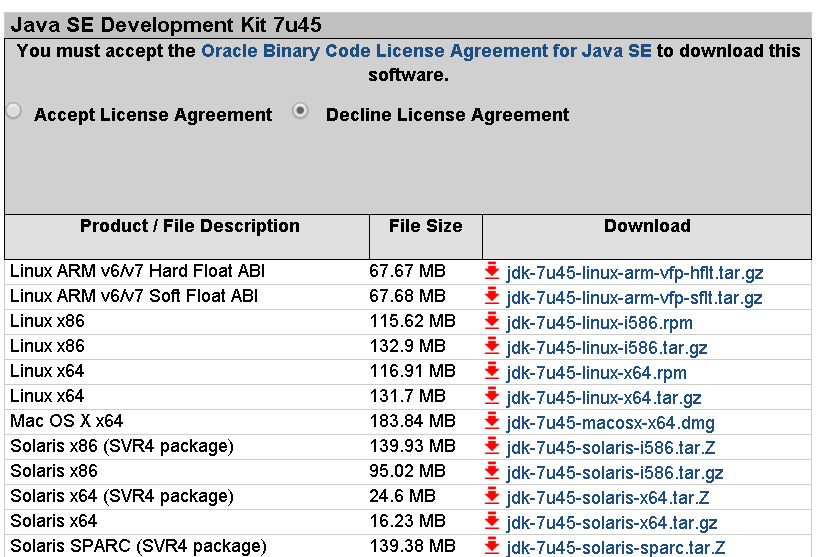
Download your required JDK here.

Note: I can’t give you an WGET command to download, because you need to Accept License Agreement before downloading any file.

You can download and install using the RPM or the tar.gz (both with x86 or x64) on your CentOS machine:
downloadjava


In case of our CentOS we can download and install the .rpm file or the .tar.gz file.

RPM can be installed ONLY by the root.
TAR.GZ can be installed be any user on the computer.


Option A: Install using .rpm

make sure to uninstall older installations (if any):

rpm –e <package name>

To install the jdk using the downloaded rpm use the rpm command:

rpm –ivh jdk-7u45-linux-x64.rpm

If you just want to upgrade a package you’ve already installed use the -Uvh parameter.

rpm –Uvh jdk-7u45-linux-x64.rpm

Delete the .rpm file if you want to save disk space.

Read more about installation of Oracle Java on Centos here on ItekBlog


Use alternatives :

alternatives –install /usr/bin/java java /usr/java/latest/jre/bin/java 20000
alternatives –install /usr/bin/javaws javaws /usr/java/latest/jre/bin/javaws 20000

alternatives

and config your default jdk (if you have more then one) using:

using:

alternatives –config java

alternatives-config


Test your environment

Just as in the first step: type java -version to see if your have jdk installed.

oraclejavaversion


Option B: Install using tar.gz

The advantage of tar.gz installation of the JDK is that we can able to install multiple version of java if required.

The archive can be installed by anyone (not only root users), in any location that you can write to. However, only the root user can install the JDK into the system location.

You need to unpack the .tar.gz file (using tar -xzf) into the  the location where you would like the JDK to be installed.

Unpack the tarball and install the jdk:

tar zxvf jdk-7u<version>-linux-i586.tar.gz

Delete the .tar.gz file if you want to save disk space.


Use alternatives :

alternatives –install /usr/bin/java java /path/to/jdk1.7.0_45/bin/java 2
alternatives –config java

read more about installation of jdk in the oracle documentation.

for extended installation tutorial read this post by adam in this blog.


JDK 1.6 vs JDK 1.7

read more on What is the difference between jdk 1.6 and 1.7 ?


Environment Variables

1
JAVA_HOME

 is a 

1
environment

 variable (in Unix terminologies), or a PATH variable (in Windows terminology) you need to create to point to where Java is installed. ($JAVA_HOME/bin/java should execute the Java runtime).

Why doesn’t the Java SDK installer set JAVA_HOME?

To set it for your current session type at bash:

export JAVA_HOME=/usr/java/jdk1.7.0_05
export PATH=$PATH:$JAVA_HOME/bin

To set the JAVA_HOME permanently we need to add the commands to the ~/.bash_profile file of the user.
We can also add it /etc/profile and then source it to give to all users.


Test Environment Variables

use the echo command to check you’ve configured the variables:

echo $JAVA_HOME
echo $PATH

echovars


Installing Tomcat

After we have java installed and tested we can continue to the installation of the Tomcat server.

Download Tomcat

Since Apache Tomcat is distributed as binaries, all you have to do is to download it and start it.

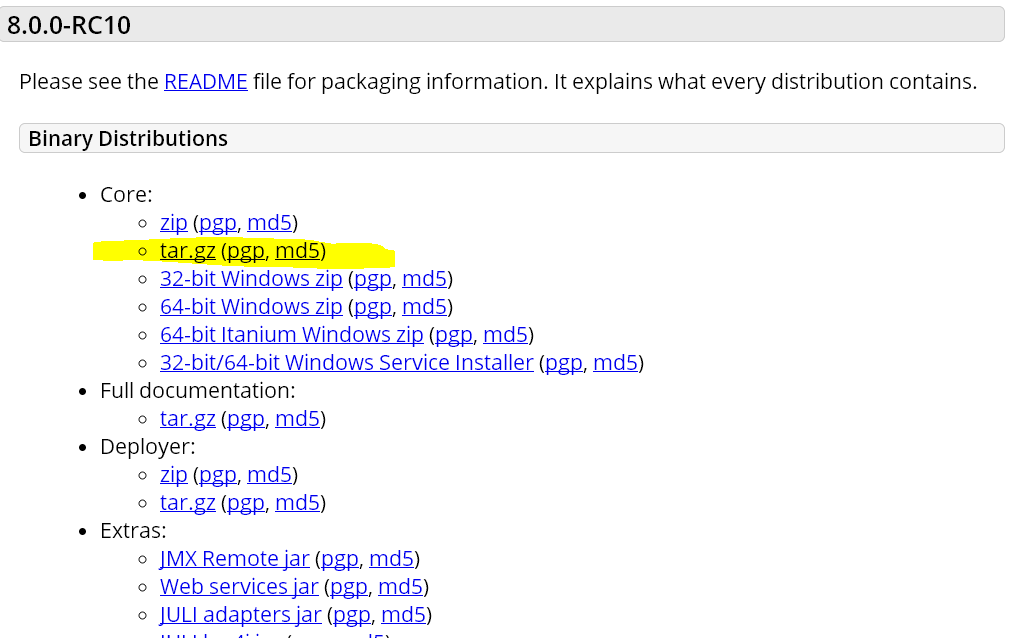
Download apache-tomcat-x.x.xx.tar.gz (latest version or any) from Apache Tomcat Homepage

I’ll go with the tomcat 8 – tar.gz package.
centos tomcat

centos tomcat

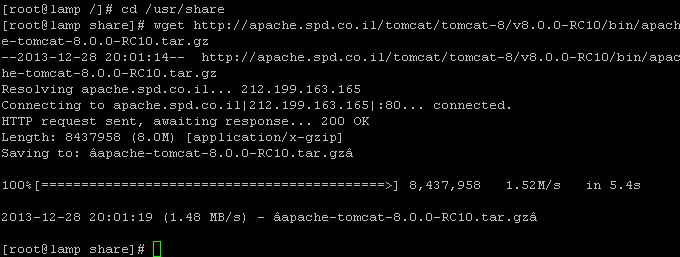
and using command:

cd /usr/share
wget http://apache.spd.co.il/tomcat/tomcat-8/v8.0.0-RC10/bin/apache-tomcat-8.0.0-RC10.tar.gz
tomcat-wget

verify and extract the download using::

md5sum apache-tomcat-8.0.0-RC10.tar.gz
tar xvzf apache-tomcat-8.0.0-RC10.tar.gz

and I have a /usr/share/apache-tomcat-8.0.0-RC10 folder now.


Test Tomcat server

Tomcat by default start on port 8080 you can start the server now by typing at bash:

cd apache-tomcat-8.0.0-RC10
./bin/startup.sh

tomcat-start


Now Access the tomcat by connecting your server with a web browser on port 8080.

http://localhost:8080
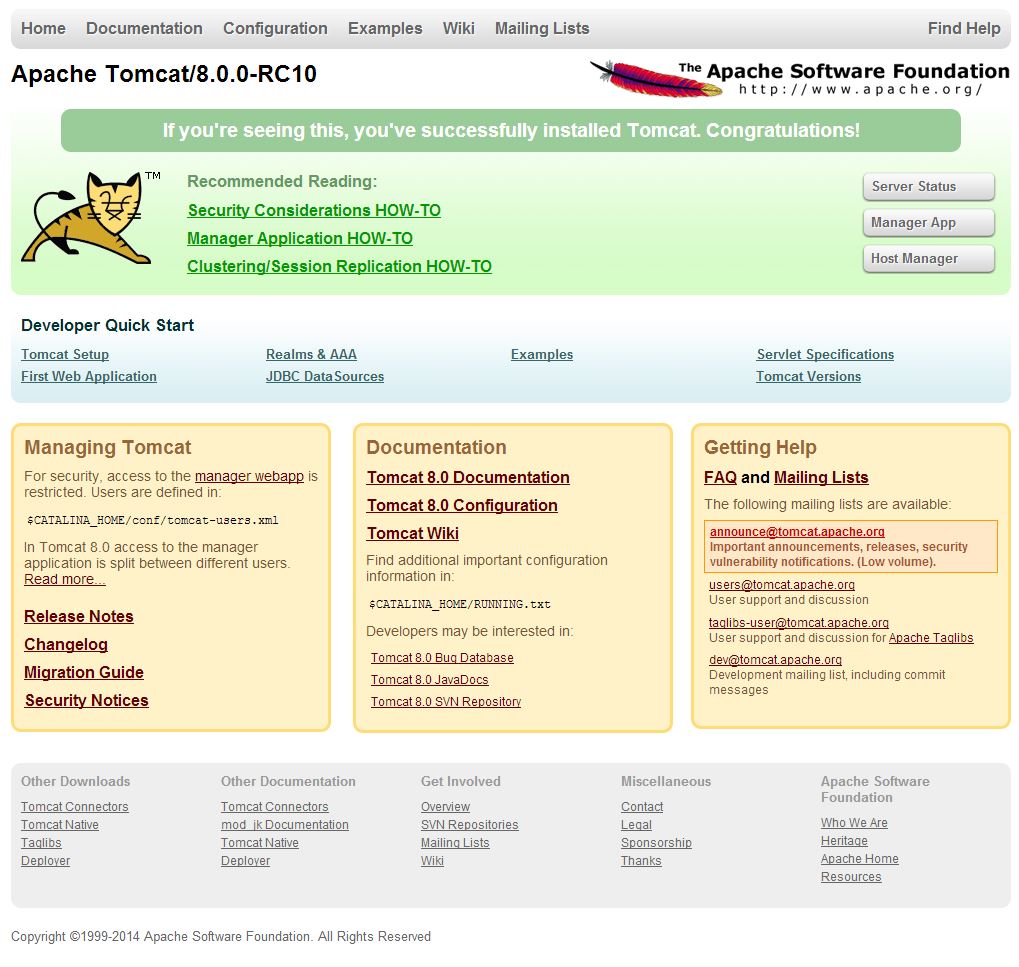
tomcat

If you cannot access the above Tomcat page, make sure to stop iptables (since CentOS has iptables on by default set to block the Tomcat’s default listening port 8080).

service iptables stop

to permanently disable iptables (NOT RECOMMENDED AT ALL) use:

chkconfig iptables off

Change the Tomcat server port

Locate server.xml in {Tomcat installation folder}/conf/ which is at /usr/share/apache-tomcat-8.0.0-RC10/conf in our case

Find the following:

 <!-- Define a non-SSL HTTP/1.1 Connector on port 8180 -->
    <Connector port="8080" maxHttpHeaderSize="8192"
               maxThreads="150" minSpareThreads="25" maxSpareThreads="75"
               enableLookups="false" redirectPort="8443" acceptCount="100"
               connectionTimeout="20000" disableUploadTimeout="true" />

and change the 8080 port to your required port.


Start on boot

To start the tomcat service on system boot create the file /etc/init.d/tomcat8 (I am using vi /etc/init.d/tomcat8) and fill it with:

#!/bin/bash 
# description: Tomcat Start Stop Restart 
# processname: tomcat 
# chkconfig: 234 20 80 
JAVA_HOME=/usr/java/jdk1.7.0_05 
export JAVA_HOME 
PATH=$JAVA_HOME/bin:$PATH 
export PATH 
CATALINA_HOME=/usr/share/apache-tomcat-8.0.0-RC10
 
case $1 in 
start) 
sh $CATALINA_HOME/bin/startup.sh 
;; 
stop) 
sh $CATALINA_HOME/bin/shutdown.sh 
;; 
restart) 
sh $CATALINA_HOME/bin/shutdown.sh 
sh $CATALINA_HOME/bin/startup.sh 
;; 
esac 
exit 0

Now set the permissions on the file and the catalina.sh file:

chmod a+x /etc/init.d/tomcat8
chmod a+x /usr/share/apache-tomcat-8.0.0-RC10/bin/catalina.sh

to start/stop/restart the service use:

service tomcat8 start
service tomcat8 restart
service tomcat8 stop

to start the service on boot use:

chkconfig --add tomcat8
chkconfig tomcat8 on

to disable it later you can use off instead of on:

chkconfig tomcat8 off


That’s it! you have your CentOS Tomcat server working and runing… 

G-WAN

CentOS G-WAN server installation instructions

CentOS G-WAN Server

CentOS G-WAN server

G-WAN is a web server with scripts in Asm, C, C++, C#, D, Go, Java, Javascript, Lua, Objective-C, Perl, PHP, Python, Ruby and Scala.

G-WAN better uses CPU Cores
to make the Internet of Things
fly thousand times higher !

Leverage legacy servers and
low-consumption CPUs to
do more with less!

G-WAN works best on Linux distributions like Debian or CentOS, both of which offer ‘Desktop’ and ‘Server’ flavors.


CentOS G-WAN server installation instructions

CentOS G-WAN installation instructions


Installation

choose a location for your installation. for demonstration purposes we’ll install G-WAN to /opt

cd /opt
wget http://gwan.com/archives/gwan_linux64-bit.tar.bz2
tar -xjf gwan_linux64-bit.tar.bz2; cd gwan_linux64-bit
sudo ./gwan
centos g-wan

centos g-wan

use the 32bit version instead (http://gwan.com/archives/gwan_linux32-bit.tar.bz2) if you need.

Test

Then, type http://localhost:8080/ in your browser

centos g-wan

centos g-wan server default homepage

and play with the/gwan/.../csp samples.


Programming Languages

If you want to install more Programming Languages read the FAQ – Setup of Programming Languages

To install all 15 languages using the bash script donated by generous user on many Linux distributions (Debian, LinuxMint, CentOS, Fedora, RedHat, Manjaro, Arch Linux and Bridge) use:

cd /opt
wget http://www.as2.com/linux/tools/G-WAN_full-install.tar.bz2
tar -xjf G-WAN_full-install.tar.bz2
./G-WAN_full-install

The installation menu is available in English, German, French and Spanish!


Service mode

To start G-WAN as a service (make it start automatically at boot time) use this instructions

with one exception for CentOS in the manual:

instead of:

sudo update-rc.d gwan defaults 95 5

use:

sudo chkconfig gwan on

and you don’t need to restart.


What’s next?

check the API and Frequently Asked Questions.

Stackoverflow lists many more examples and will let you search for replies to common questions.


And that’s it. you have G-WAN server.

iptables examples on CentOS

Overview

“iptables is a user space application program that allows a system administrator to configure the tables provided by the Linux kernel firewall (implemented as different Netfilter modules) and the chains and rules it stores.
Different kernel modules and programs are currently used for different protocols; iptables applies to IPv4, ip6tables to IPv6, arptables to ARP, and ebtables to Ethernet frames.”

In this tutorial I will give a few essential examples of how to use iptables on CentOS
Continue reading

VMWare Workstation start on boot CentOS

VMWare Workstation start on boot CentOS

vmware workstation start on boot centos

If you are like me, using VMWare workstation on Linux (CentOS 6.4), and you want to start your virtual machines on boot, I have the answer.

Prerequisities

  • CentOS 6.x. – although the vmrun command may be working in other distributions too.
  • VMWare Workstation 4.0+


 VMWare Workstation start on boot CentOS

VMWare Workstation start on boot CentOS


The Solution

Edit rc.local

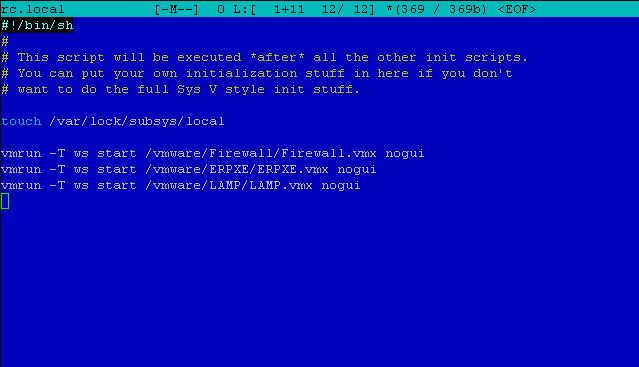
add to the end of the following file:

/etc/rc.d/rc.local

the following:

vmrun -T ws start /path/to/machine.vmx nogui

create new line for each machine you want to start on boot.


that’s it! that how you run vmware workstation start on boot centos


That’s it.

Django CentOS 6.4 installation instructions for noobs.

Django Centos 6.4 installation instructions for noobs.

So you want to build your first django centos 6.4 based web site? This is quite easy to install and configure. I’ll cover how to install Python/Django on your centos.

Django Centos

Prerequisite

  • CentOS 6.4 (For the matter of fact, this tutuorial is good for all the CentOS 6.x series)
  • Apache (httpd)


What is Python?

Python is a general-purpose, high-level programming language whose design philosophy emphasizes code readability. Its syntax is said to be clear and expressive.” from Wikipedia.

Visit http://www.python.org/


What is Django?

“Django is a high-level Python Web framework that encourages rapid development and clean, pragmatic design.” from https://www.djangoproject.com/

Installing Python

Prerequisites

you may need the EPEL repositories for Centos.

1
2
3
4
cd /opt/
wget http://mirrors.nl.eu.kernel.org/fedora-epel/6/i386/epel-release-6-8.noarch.rpm
rpm -Uvh epel-release-6-8.noarch.rpm
rm epel-release-6-8.noarch.rpm -f
cd /opt/
wget http://mirrors.nl.eu.kernel.org/fedora-epel/6/i386/epel-release-6-8.noarch.rpm
rpm -Uvh epel-release-6-8.noarch.rpm
rm epel-release-6-8.noarch.rpm -f


Installation Process

Simple as:

1
yum install python
yum install python

test python by typing: “python” and you should see something similar to: (CTRL+D to exit)

At the time of writing (September 30 2013), the version of python@EPEL is 2.6.6

Django works with any Python version from 2.6.5 to 2.7. It also features experimental support for versions 3.2 and 3.3. All these versions of Python include a lightweight database called SQLite so you won’t need to set up a database just yet unless you need other SQL


Installing SQL

Django works with several DB engines. for simplicity, Install SQLite:

yum install sqlite

If you need other SQL Server else then SQLite,  you can follow:
MySQL/MongoDB/CouchDB on RHEL/Centos 6.3
If you don’t need SQL and you installed Python 2.5 or later, you can skip this step for now.


Installing Django

You can install using EPEL repositories any yum (like in the old article I wrote), but I recommend to use the easy_install method from the python-setuptools package, which I’ll show next:

1
2
yum install python-setuptools
easy_install django
yum install python-setuptools
easy_install django


Testing Django

Test Django by typing python on your command and then:

1
2
import django
print django.get_version()
import django
print django.get_version()

python-django-1.5.4

As you can see, the RPM version is version 1.5.4, while the current release in the EPEL version is 1.3.1. Internationalization: in template code is not available in 1.3.1 for example but only from Django 1.4


Creating Project

From the command, cd into a directory where you’d like to store your app, then run the following command:

1
2
django-admin.py startproject mysite
cd mysite
django-admin.py startproject mysite
cd mysite

 Note: if you are installing Django using EPEL repos, the command will be django-admin and not django-admin.py.

Starting Server

1
python manage.py runserver

You’ve started the Django development server, a lightweight Web server – easier to startwithout having to deal with configuring a production server — such as Apache — until you’re ready for production.

Browse to http://127.0.0.1:8000/ with your Web browser. You’ll see a “Welcome to Django” page. It worked!

To change port:

1
python manage.py runserver 8080

If you need to start the server to answer not only locally, use:

1
python manage.py runserver 0.0.0.0:8000


Remember: Apache loads Django environment when starting and keep running it even when source is changed! I suggest you to use Django ‘runserver’ (which automatically restarts on source code changes) in development sessions, unless you need some Apache-specific features.


Configure more…

Config Database

Edit mysite/settings.py. It’s a normal Python module with module-level variables representing Django settings.

Help here.


Django using Apache

To run your Django application inside apache – use either mod_python or mod_wsgi, Support for mod_python will be deprecated in a future release of Django. If you are configuring a new deployment, you are strongly encouraged to consider using mod_wsgi or any of the other supported backends.


OPTION A: Install mod_python (NOT recommended)

For this to work, you must have apache installed and configured.

1
yum install mod_python

python using mod_python

you need to configure you apache/VirtualHost to:

    AddHandler mod_python .py
    PythonHandler mod_python.publisher | .py
    AddHandler mod_python .psp .psp_
    PythonHandler mod_python.psp | .psp .psp_
    PythonDebug On</pre>
[/code]

 
<h3>Testing mod_python</h3>
Create a '<em>test.py'</em> file in your apache server. put inside:
[code lang="py"]<% req.write("Hello World!") %>[/code]

and browse to www.your.server/test.py and you should see the "Hello World!" there.
<h3>Django using mod_python</h3>
Edit your <tt>httpd.conf</tt> file:

[code lang="apache"]
<pre><Location "/mysite/">
    SetHandler python-program
    PythonHandler django.core.handlers.modpython
    SetEnv DJANGO_SETTINGS_MODULE mysite.settings
    PythonOption django.root /mysite
    PythonDebug On
</Location>

read more…


Option B: Install mod_wsgi (RECOMMENDED)

Deploying Django with Apache and mod_wsgi is the recommended way to get Django into production.

1
yum install mod_wsgi


to use mod_wsgi, create an apache folder inside your project and create a django.wsgi file:

import os, sys
sys.path.append('/var/www/django')
sys.path.append('/var/www/django/mysite')
os.environ['DJANGO_SETTINGS_MODULE'] = 'mysite.settings'

import django.core.handlers.wsgi

application = django.core.handlers.wsgi.WSGIHandler()


and configure your apache with:

<VirtualHost *:80>

ServerName www.example.com
ServerAlias www.example.com
WSGIScriptAlias / /var/www/django/mysite/apache/django.wsgi

# Alias /robots.txt /var/www/django/mysite/static/robots.txt
# Alias /favicon.ico /var/www/django/mysite/static/favicon.ico
Alias /static/admin/ /usr/lib/python2.6/site-packages/django/contrib/admin/media/
Alias /static/ /var/www/django/mysite/static/
Alias /media/ /var/www/django/mysite/media/

<Directory /var/www/django/mysite>
Order allow,deny
Allow from all
</Directory>

<Directory /var/www/django/mysite/media>
Order deny,allow
Allow from all
</Directory>

<Directory /var/www/django/mysite/static>
Order deny,allow
Allow from all
</Directory>
</VirtualHost>


read more on: multiple django sites with apache & mod_wsgi


That’s it!


You’ve Python / Django installed on your Centos 6.4 and a new project template waiting for you to work on.


Continue reading…

* this article is an edited version of an older article.

Setup BIND DNS Server on CentOS 7

VMware Tools CentOS 6.x easy installation guide.

VMware Tools CentOS 6.x easy installation guide.

Prerequisities

if you have installed new setup of centos or you haven’t installed yet, you need make, gcc, kernel-devel..

Continue reading

VMWare Workstation start on boot CentOS

CentOS RPMForge Installation Instructions (for Centos 6.x)

CentOS RPMForge Installation Instructions (for Centos 6.x)

Overview

If you want to add the RPMForge repo to your CentOS, use the following instructions


Downloading RPMForge repo

cd /tmp
# for 32 bit:
wget http://pkgs.repoforge.org/rpmforge-release/rpmforge-release-0.5.3-1.el6.rf.i686.rpm
# for 64 bit:
wget http://pkgs.repoforge.org/rpmforge-release/rpmforge-release-0.5.3-1.el6.rf.x86_64.rpm

Note: Visit here to see if newer version exist.

Installing RPMForge

rpm –import http://apt.sw.be/RPM-GPG-KEY.dag.txt

# for 32 bit:
rpm -i rpmforge-release-0.5.3-1.el6.rf.i686.rpm
# for 64 bit:
rpm -i rpmforge-release-0.5.3-1.el6.rf.x86_64.rpm

yum clean all

Open Extra Repo

If you want, you can enable the extra repo using:

cd /etc/yum.repos.d

edit using vi/vom/mc rpmforge.repo:
change the enabled flag to enabled=1 in the section [rpmforge-extras].


Update all

yum update


That’s it!

VMWare Workstation start on boot CentOS

Update Git CentOS – to version 1.7.11+ (on CentOS 6.x)

Update Git Centos – to version 1.7.11+ (on CentOS 6.x)

Overview

If you want to update your Git to newer version then on CentOS repository, use the following instructions


Downloading RPMForge repo

cd /tmp
# for 32 bit:
wget http://pkgs.repoforge.org/rpmforge-release/rpmforge-release-0.5.3-1.el6.rf.i686.rpm
# for 64 bit:
wget http://pkgs.repoforge.org/rpmforge-release/rpmforge-release-0.5.3-1.el6.rf.x86_64.rpm

Note: Visit here to see if newer version exist.

Installing RPMForge

rpm –import http://apt.sw.be/RPM-GPG-KEY.dag.txt
# for 32 bit:
rpm -i rpmforge-release-0.5.3-1.el6.rf.i686.rpm
# for 64 bit:
rpm -i rpmforge-release-0.5.3-1.el6.rf.x86_64.rpm

Open Extra Repo

yum clean all

cd /etc/yum.repos.d

edit using vi/vom/mc rpmforge.repo:
change the enabled flag to enabled=1 in the section [rpmforge-extras].


Update Git

yum update git

yum provides git will help you see all versions available.

git –version

Will show you have the new release installed. (1.7.11.3 for me)


That’s it!

gevent CentOS 6.x Installation Guide

gevent CentOS 6.x Installation Guide

gevent CentOS 6.x Installation Guide

Installation

Requirments

  • yum install python python-devel
  • yum install libevent-devel


Install Setuptools

install python-setuptools (for easy_install)

yum install python-setuptools

Install greenlet

Install greenlet:

easy_install greenlet

Install gevent

There are several ways to install gevent:

using easy_install (recommended)

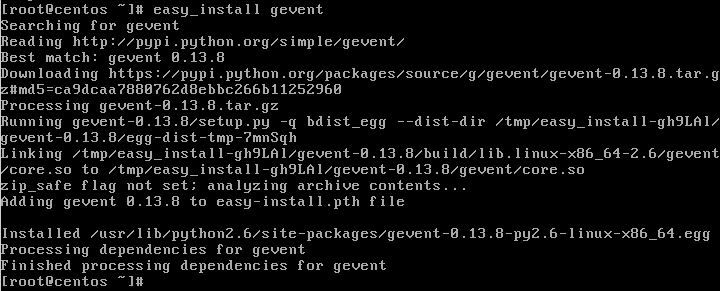
easy as:

easy_install gevent

centos gevent

from source

You need wget to download source:

yum install wget

Now, installing gevent: (Check here for the latest package)

cd /tmp wget http://pypi.python.org/packages/source/g/gevent/gevent-0.13.8.tar.gz tar -xvzf gevent-0.13.8.tar.gz cd gevent-0.13.8 python setup.py install

U may need to add –no-check-certificate to the wget if something is wrong.

from GitHub

You can also install gevent from github using pip.

Test

to test simply run in bash:

python

and then:

import gevent

if no error found, you have installed it correctly python-import-gevent

First App

Example taken from the community documentation:

1
2
3
4
5
6
7
8
9
10
11
12
13
14
from gevent.wsgi import WSGIServer
 
def application(environ, start_response):
    status = '200 OK'
    body = '<p>Hello World</p>'
 
    headers = [
        ('Content-Type', 'text/html')
    ]
 
    start_response(status, headers)
    return [body]
 
WSGIServer(('', 8000), application).serve_forever()
from gevent.wsgi import WSGIServer

def application(environ, start_response):
    status = '200 OK'
    body = '<p>Hello World</p>'

    headers = [
        ('Content-Type', 'text/html')
    ]

    start_response(status, headers)
    return [body]

WSGIServer(('', 8000), application).serve_forever()

copy the example into a file (server.py for ex), and start the server by:

python server.py

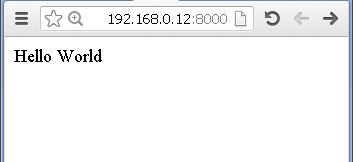
and that’s it! browse to the machine on port 8000 using something like this:

http://[ip of the machine]:8000

gevent-working

What’s next..?


Production

In production you can host your gevent after several WSGI server racks like: Gunicorn, Circus, Meinheld, uWSGI, etc..

Gunicorn is the most common WSGI server to host gevent applications. one benchmark shows that Circus is faster then Gunicorn. other tested uWSGI vs Gunicorn and found that uWSGI is faster.

recommend you run them behind a reverse proxy such as nginx. Additional advantages of running them behind a reverse proxy include improved handling of slow clients and bad HTTP requests


SocketIO

You need socketio? you may want to install it:

easy_install gevent-socketio


Read more…


need microframework? (flask/bottle)?

You can use a python web framework on top of gevent.