The Error
This is a solution for UnicodeEncodeError raised when saving a ‘POST’ in Django form where filename is in different encoding then ‘ASCII’. ( ‘ascii’ codec can’t encode characters in position )
‘ascii’ codec can’t encode characters in position
Posting the form raising error in Django:
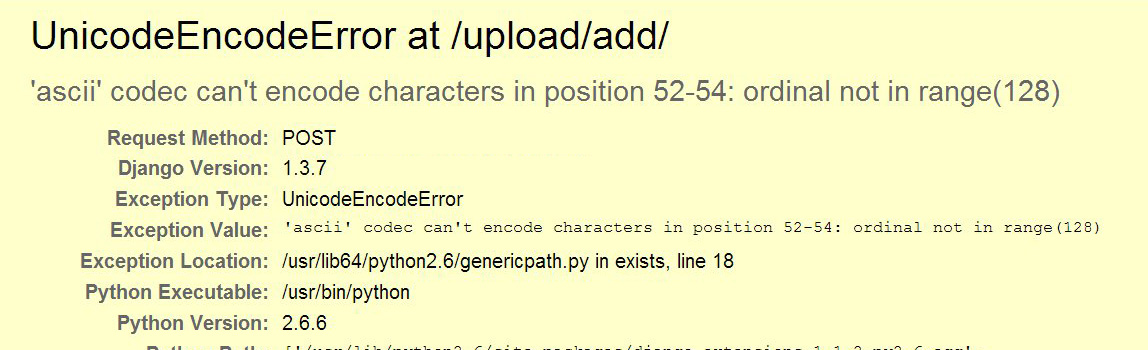
UnicodeEncodeError at /upload/add/
‘ascii’ codec can’t encode characters in position 52-54: ordinal not in range(128)
UnicodeEncodeError raised when saving a ‘POST’ in Django form where filename is in UTF-8 encoding and converted by Django to ‘ASCII’.
Posting the form raising error in Django:
Trackback
File “/usr/lib/python2.6/site-packages/django/core/handlers/base.py” in get_response
111. response = callback(request, *callback_args, **callback_kwargs)
File “/usr/lib/python2.6/site-packages/django/views/generic/base.py” in view
47. return self.dispatch(request, *args, **kwargs)
File “/usr/lib/python2.6/site-packages/django/views/generic/base.py” in dispatch
68. return handler(request, *args, **kwargs)
File “/usr/lib/python2.6/site-packages/django/views/generic/edit.py” in post
138. return self.form_valid(form)
File “/var/www/websites/mysite/fileupload/views.py” in form_valid
54. obj.save()
File “/var/www/websites/mysite/fileupload/models.py” in save
25. super(Picture, self).save(*args, **kwargs)
File “/usr/lib/python2.6/site-packages/django/db/models/base.py” in save
460. self.save_base(using=using, force_insert=force_insert, force_update=force_update)
File “/usr/lib/python2.6/site-packages/django/db/models/base.py” in save_base
543. for f in meta.local_fields if not isinstance(f, AutoField)]
File “/usr/lib/python2.6/site-packages/django/db/models/fields/files.py” in pre_save
255. file.save(file.name, file, save=False)
File “/usr/lib/python2.6/site-packages/django/db/models/fields/files.py” in save
92. self.name = self.storage.save(name, content)
File “/usr/lib/python2.6/site-packages/django/core/files/storage.py” in save
48. name = self.get_available_name(name)
File “/usr/lib/python2.6/site-packages/django/core/files/storage.py” in get_available_name
74. while self.exists(name):
File “/usr/lib/python2.6/site-packages/django/core/files/storage.py” in exists
218. return os.path.exists(self.path(name))
File “/usr/lib64/python2.6/genericpath.py” in exists
18. st = os.stat(path)
Exception Type: UnicodeEncodeError at /upload/add/
Exception Value: ‘ascii’ codec can’t encode characters in position 52-54: ordinal not in range(128)
The Code
In the model I have:
file = models.ImageField(upload_to=”pictures”)
the error raised on the line in the view.py:
obj.save()
Explanation of the error
Ticket #11030 is talking about this error.
Reverted a change that assumed the file system encoding was utf8, and changed a test to demonstrate how that assumption corrupted uploaded non-ASCII file names on systems that don’t use utf8 as their file system encoding (Windows for one, specifically).
Some servers do not have the necessary files to allow successfully setting the locale to one that supports utf-8 encoding. See here.
The meaning of this is that Django assumes the file system is non UTF-8 and validates that the filename is ASCII. The error raised when the file name is in UTF-8.
Test FileSystem
The problem may be in different places. We need to search for the problem:
Sys.getfilesystemencoding()
from here:
Django is passing a unicode string “path” to the os.stat() function. On many operating systems, Python must actually pass a bytestring, not unicode, to the underlying OS routine that implements “stat”. Therefore Python must convert the unicode string to a bytestring using some encoding. The encoding it uses is whatever is returned by os.getfilesystemencoding
To get the system encoding using the sys.getfilesystemencoding(), enter python at bash and then:
import sys
sys.getfilesystemencoding()
If the output is:
‘UTF-8’
You don’t have problem with your system encoding.
If the problem is here, and you get back ‘ASCII’, change it according to your system.
Locale
Check the locale Object (again in python shell)
import locale
locale.getdefaultlocale()
Again, if the output is: (‘en_US’, ‘UTF8’) – the problem is not here. if it is – change it according to your system.
If the system is ok, then probably the problem is with you web server (Apache, Nginx, etc)
Test Apache
Are you using apache? mod_wsgi? Maybe the problem is here.
LC_ALL & LANG
To see locale on your centos type at bash:
locale
You should see something like this:
# locale
LANG=en_US.UTF-8
LC_CTYPE=”en_US.UTF-8″
LC_NUMERIC=”en_US.UTF-8″
LC_TIME=”en_US.UTF-8″
LC_COLLATE=”en_US.UTF-8″
LC_MONETARY=”en_US.UTF-8″
LC_MESSAGES=”en_US.UTF-8″
LC_PAPER=”en_US.UTF-8″
LC_NAME=”en_US.UTF-8″
LC_ADDRESS=”en_US.UTF-8″
LC_TELEPHONE=”en_US.UTF-8″
LC_MEASUREMENT=”en_US.UTF-8″
LC_IDENTIFICATION=”en_US.UTF-8″
LC_ALL=en_US.UTF-8
if you see:
LC_ALL=
then probable using this python script:
import locale
locale.getlocale()
will return (None, None)
type for all available locale:
locale -a
Unfortunately LANG is often set incorrectly when running under Apache. Documenting the need to set LANG properly under Apache is the subject of #10426,
In [11170] Added note on language variables required for Apache to survive non-ASCII file uploads:
If you get a UnicodeEncodeError
===============================
If you’re taking advantage of the internationalization features of Django (see
:ref:`topics-i18n`) and you intend to allow users to upload files, you must
ensure that the environment used to start Apache is configured to accept
non-ASCII file names. If your environment is not correctly configured, you
will trigger “UnicodeEncodeError“ exceptions when calling functions like
“os.path()“ on filenames that contain non-ASCII characters.
To avoid these problems, the environment used to start Apache should contain
settings analogous to the following::
export LANG=’en_US.UTF-8′
export LC_ALL=’en_US.UTF-8′
Consult the documentation for your operating system for the appropriate syntax
and location to put these configuration items; “/etc/apache2/envvars“ is a
common location on Unix platforms. Once you have added these statements
to your environment, restart Apache.
Check your Django app settings.py to see if I18N is enabled:
USE_I18N = True
Check locale using Django View/Template
Create view:
1
2
3
4
5
6
7
8
9
10
| import locale
import sys
def view_locale(request):
loc_info = "getlocale: " + str(locale.getlocale()) + \
"<br/>getdefaultlocale(): " + str(locale.getdefaultlocale()) + \
"<br/>fs_encoding: " + str(sys.getfilesystemencoding()) + \
"<br/>sys default encoding: " + str(sys.getdefaultencoding())
"<br/>sys default encoding: " + str(sys.getdefaultencoding())
return HttpResponse(loc_info) |
import locale
import sys
def view_locale(request):
loc_info = "getlocale: " + str(locale.getlocale()) + \
"<br/>getdefaultlocale(): " + str(locale.getdefaultlocale()) + \
"<br/>fs_encoding: " + str(sys.getfilesystemencoding()) + \
"<br/>sys default encoding: " + str(sys.getdefaultencoding())
"<br/>sys default encoding: " + str(sys.getdefaultencoding())
return HttpResponse(loc_info)
and also create a url pattern:
url(r’^locale/$’, ‘myapp.views.view_locale’),
Browse to ‘yoursite.com/locale‘, to check for problems:
getlocale: (None, None)
getdefaultlocale(): (None, None)
fs_encoding: ANSI_X3.4-1968
sys default encoding: ascii
If the view return something like the above, and everything we checked is ok until now, It’s mean that maybe the problem is with your web-server (apache, nginx, etc.):
Solution for Apache encoding problem
Set LANG & LC_ALL
non-ascii filenames with the Django storage system with the default apache settings on most systems will trigger UnicodeEncodeError exceptions when calling functions like os.path(). To avoid these issues, ensure that the following lines are included in your apache envvars file (typically found in /etc/apache2/envvars).
export LANG='en_US.UTF-8'
export LC_ALL='en_US.UTF-8'
To see your active envvars use:
printenv
This error likely wont rear its head during development on the test server as, when run from the command line, the ./manage.py script inherits the users language and locale settings.
Consult the documentation for your operating system for the appropriate syntax and location to put these configuration items; /etc/apache2/envvars is a common location on Unix platforms (Not all Apache distributions have a envvars file). Once you have added these statements to your environment, restart Apache.
if the ‘envvars’ file doesn’t exist. In that case you will need
to modify the environment of the startup script which is used to
startup Apache in the first place. I believe that for most Linux
systems this can be done by modifying:
/etc/sysconfig/httpd
or
/etc/init.d/httpd
or
/etc/init.d/apache
depending on the distro.
If everything fine, when you’ll add those lines and restart the httpd (apache) server you should get at the /locale view:
getlocale: (‘en_US’, ‘UTF8’)
getdefaultlocale(): (‘en_US’, ‘UTF8’)
fs_encoding: UTF-8
sys default encoding: utf-8
And your app should work now!
Some had also add the lines to ~/.bashrc or to the .htaccess, but I haven’t tested it.
Do not use the .wsgi script!
I tried to add the LANG and LC_ALL to the .wsgi instead (from some instructions) and failed becuase:
Some are adding the LANG & LC_ALL to the .WSGI loading script:
os.environ['LANG']='en_US.UTF-8'
os.environ['LC_ALL']='en_US.UTF-8'
Using the view we created earlier (if you had problem) you can see now that
getdefaultlocale(): (‘en_US’, ‘UTF8’).
But the others function may still return ASCII values:
getlocale: (None, None)
getdefaultlocale(): (‘en_US’, ‘UTF8’)
fs_encoding: ANSI_X3.4-1968
sys default encoding: ascii
adding:
import sys
reload(sys)
sys.setdefaultencoding('utf-8')
And now you can see that the sys default encoding is: UTF-8.
reload is important This is python 2.x problem, not the django.
BUT
as you can see:
1
| (sys.getfilesystemencoding() |
(sys.getfilesystemencoding()
return:
ANSI_X3.4-1968
and that is the problem we have. Django doesn’t recognize the filesystem as UTF-8
SetEnv directive does not modify process environment variables, except
for CGI scripts spawned from Apache. In Apache/mod_wsgi they only
affect the per request WSGI environment.
Setting them in the WSGI script file also will have no affect, as
Python works out the default encoding when the interpreter is first
initialised, which means that doing it in the script file is too late.
What this is mean that you should insert export the LANG and LC_ALL earlier.
Test AddDefaultCharset (httpd.conf)
Check the httpd.conf for:
AddDefaultCharset
The problem may be there.
You can try to set it to
AddDefaultCharset UTF-8
or to off:
AddDefaultCharset Off
Test Nginx
If you have nginx installed, Add
line in
section in main Nginx config file (
) or in section
in your virtual server config file.
Read more about Nginx HttpCharsetModule.
Django Admin
So, you’ve fixed the app.. now you can upload non ascii files but the Django admin return UnicodeEncodeError when you try to view the row in the admin panel?
Just fix your model __UNICODE__ function to return unicode (u”):
1
2
| def __unicode__(self):
return u'%s' % (self.file) |
def __unicode__(self):
   return u'%s' % (self.file)
Read more..