Category Archives: Web Development

Codelobster IDE

Free PHP, HTML, CSS, JavaScript editor – Codelobster IDE

In this article, we suggest you to get acquainted with the free editor of web languages – Codelobster IDE. It is presented on the software market for a long time already, and it wins a lot of fans.

Codelobster IDE allows you to edit PHP, HTML, CSS and JavaScript files, it highlights the syntax and gives hints for tags, functions and their parameters. This editor easily deals with those files that contain a mixed content.

Continue reading

Template engine – Why it’s better to use two of them at once?

Template engine

In the following post I’ll try to show and explain how and why I am using two template engines in every application I’m working on. Also, why and how I am choosing my template engine(s) I’m working with.

Continue reading

cento tomcat

CentOS Tomcat server installation is easy!

CentOS Tomcat installation

CentOS Tomcat

centos tomcat

“Apache Tomcat is an open source software implementation of the Java Servlet and JavaServer Pages technologies. The Java Servlet and JavaServer Pages specifications are developed under the Java Community Process.” from Tomcat homepage.


Prerequisities

  • CentOS 6.x (I haven’t tested this on older versions but it should probably work as well) 

Check your Java installation

before we’ll continue the installation of Tomcat, the JDK (Java Development Kit) should be installed on your CentOS machine. to check for Java support use the command:

java -version

javanotfound

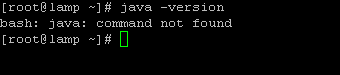
if bash returns ‘command not found‘ then continue to the next step and install the JDK, else skip the step and continue to Tomcat server installation.


Install Java Development Kit (JDK)

To install the jdk we have 2 options:

  1. Install OpenJDK – Using YUM.
  2. Install Oracle JDK – Install manually.

I’ll explore both:

Option 1: Install Open-JDK using YUM

For beginners and testing purposes you should go with this option.

Why should I use the Oracle JDK over the OpenJDK, or vice-versa? [closed]

The command to install JDK using YUM is very simple:

yum install java

yuminstall java

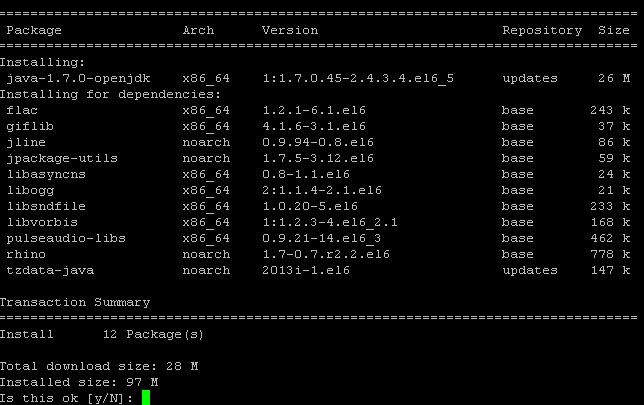
  • Note: use sudo if you are not logged-in with root.
  • the command will install the latest jdk (1.7 as for this date). If you want to install older version use the full name (search using: $ yum search jdk)yum-search-jdk
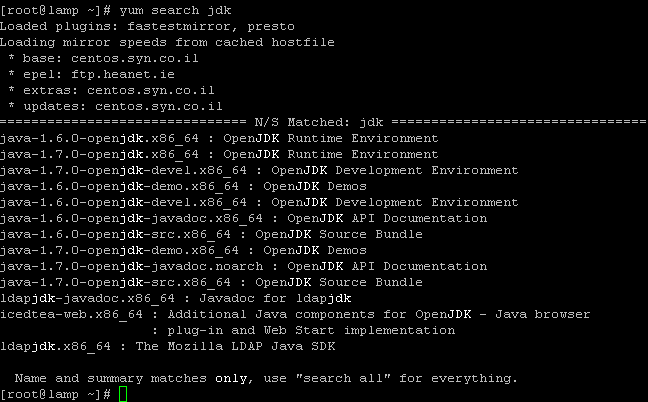
    You can see you can install the 1.6 version by typing: yum install java-1.6.0

Check you have installed it right:

javafound


Option 2: Install JDK manually

Download your required JDK here.

Note: I can’t give you an WGET command to download, because you need to Accept License Agreement before downloading any file.

You can download and install using the RPM or the tar.gz (both with x86 or x64) on your CentOS machine:

downloadjava


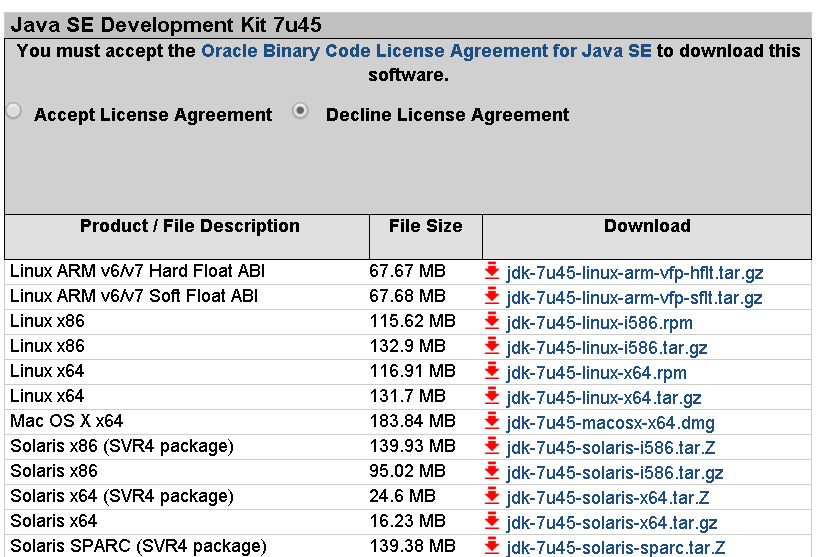
In case of our CentOS we can download and install the .rpm file or the .tar.gz file.

RPM can be installed ONLY by the root.
TAR.GZ can be installed be any user on the computer.


Option A: Install using .rpm

make sure to uninstall older installations (if any):

rpm –e <package name>

To install the jdk using the downloaded rpm use the rpm command:

rpm –ivh jdk-7u45-linux-x64.rpm

If you just want to upgrade a package you’ve already installed use the -Uvh parameter.

rpm –Uvh jdk-7u45-linux-x64.rpm

Delete the .rpm file if you want to save disk space.

Read more about installation of Oracle Java on Centos here on ItekBlog


Use alternatives :

alternatives –install /usr/bin/java java /usr/java/latest/jre/bin/java 20000
alternatives –install /usr/bin/javaws javaws /usr/java/latest/jre/bin/javaws 20000

alternatives

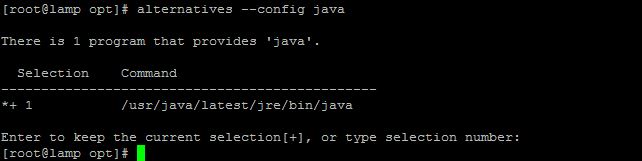
and config your default jdk (if you have more then one) using:

using:

alternatives –config java

alternatives-config


Test your environment

Just as in the first step: type java -version to see if your have jdk installed.

oraclejavaversion


Option B: Install using tar.gz

The advantage of tar.gz installation of the JDK is that we can able to install multiple version of java if required.

The archive can be installed by anyone (not only root users), in any location that you can write to. However, only the root user can install the JDK into the system location.

You need to unpack the .tar.gz file (using tar -xzf) into the  the location where you would like the JDK to be installed.

Unpack the tarball and install the jdk:

tar zxvf jdk-7u<version>-linux-i586.tar.gz

Delete the .tar.gz file if you want to save disk space.


Use alternatives :

alternatives –install /usr/bin/java java /path/to/jdk1.7.0_45/bin/java 2
alternatives –config java

read more about installation of jdk in the oracle documentation.

for extended installation tutorial read this post by adam in this blog.


JDK 1.6 vs JDK 1.7

read more on What is the difference between jdk 1.6 and 1.7 ?


Environment Variables

1
JAVA_HOME

 is a 

1
environment

 variable (in Unix terminologies), or a PATH variable (in Windows terminology) you need to create to point to where Java is installed. ($JAVA_HOME/bin/java should execute the Java runtime).

Why doesn’t the Java SDK installer set JAVA_HOME?

To set it for your current session type at bash:

export JAVA_HOME=/usr/java/jdk1.7.0_05
export PATH=$PATH:$JAVA_HOME/bin

To set the JAVA_HOME permanently we need to add the commands to the ~/.bash_profile file of the user.
We can also add it /etc/profile and then source it to give to all users.


Test Environment Variables

use the echo command to check you’ve configured the variables:

echo $JAVA_HOME
echo $PATH

echovars


Installing Tomcat

After we have java installed and tested we can continue to the installation of the Tomcat server.
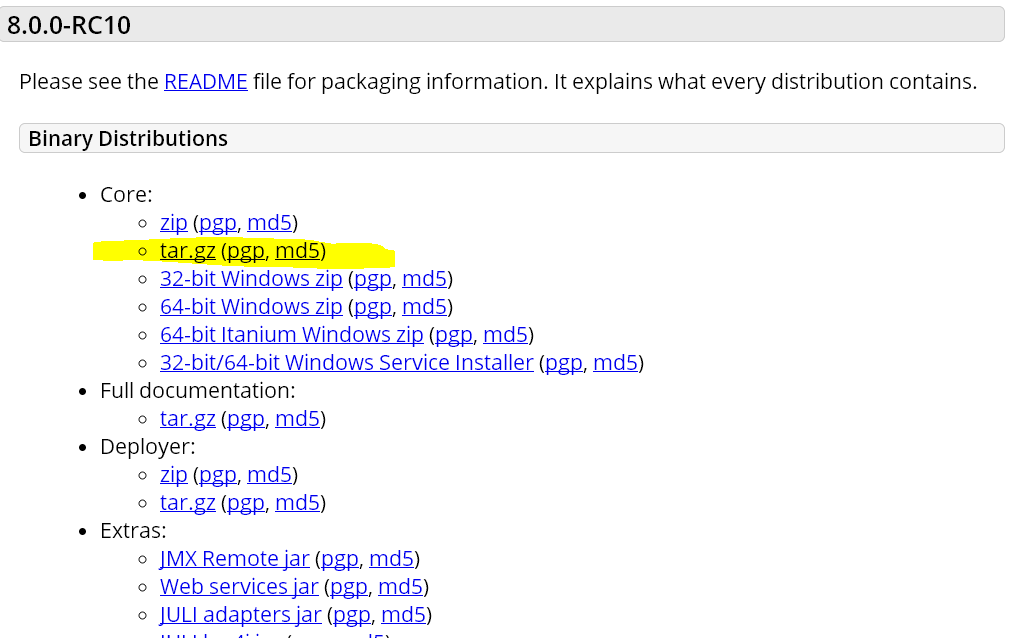
Download Tomcat

Since Apache Tomcat is distributed as binaries, all you have to do is to download it and start it.

Download apache-tomcat-x.x.xx.tar.gz (latest version or any) from Apache Tomcat Homepage

I’ll go with the tomcat 8 – tar.gz package.

centos tomcat

centos tomcat

and using command:

cd /usr/share
wget http://apache.spd.co.il/tomcat/tomcat-8/v8.0.0-RC10/bin/apache-tomcat-8.0.0-RC10.tar.gz

tomcat-wget

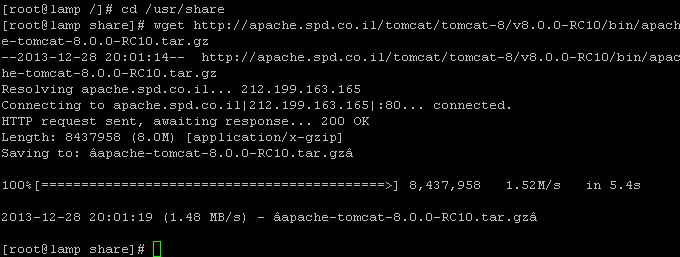
verify and extract the download using::

md5sum apache-tomcat-8.0.0-RC10.tar.gz
tar xvzf apache-tomcat-8.0.0-RC10.tar.gz

and I have a /usr/share/apache-tomcat-8.0.0-RC10 folder now.


Test Tomcat server

Tomcat by default start on port 8080 you can start the server now by typing at bash:

cd apache-tomcat-8.0.0-RC10
./bin/startup.sh

tomcat-start


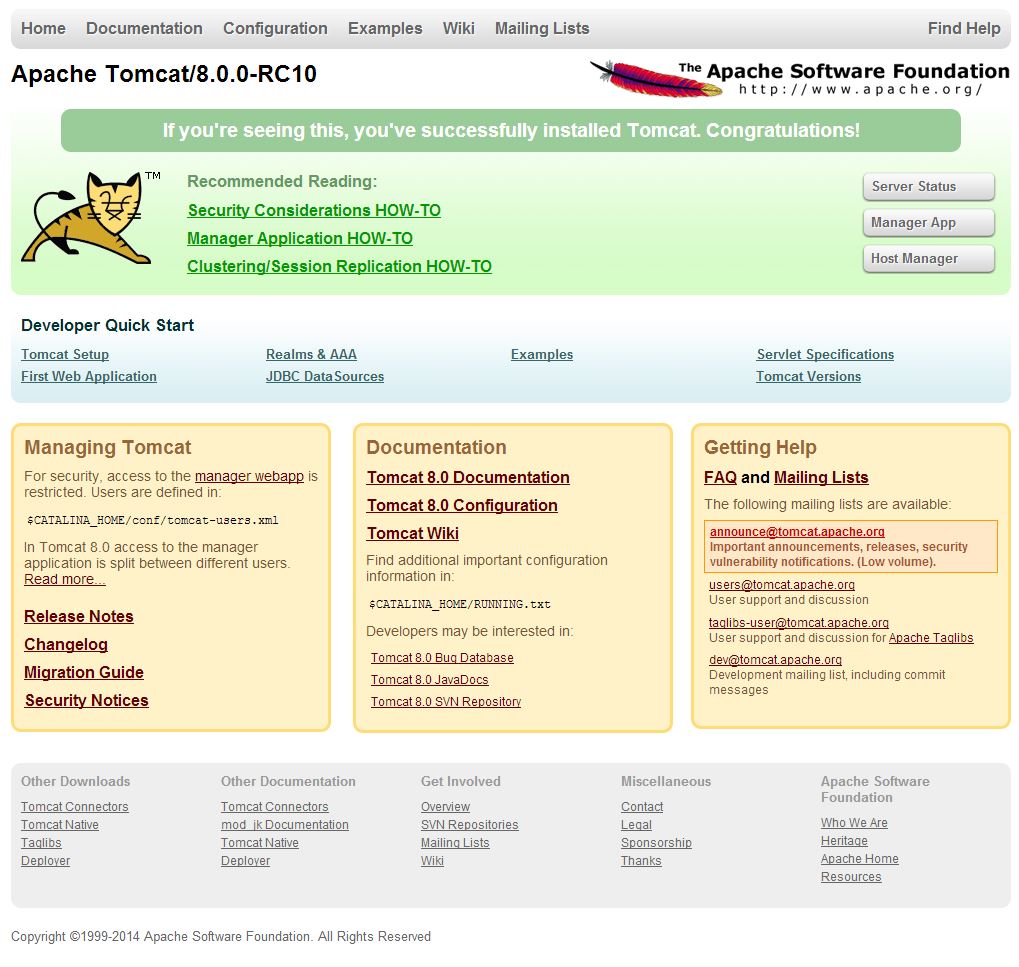
Now Access the tomcat by connecting your server with a web browser on port 8080.

http://localhost:8080

tomcat

If you cannot access the above Tomcat page, make sure to stop iptables (since CentOS has iptables on by default set to block the Tomcat’s default listening port 8080).

service iptables stop

to permanently disable iptables (NOT RECOMMENDED AT ALL) use:

chkconfig iptables off

Change the Tomcat server port

Locate server.xml in {Tomcat installation folder}/conf/ which is at /usr/share/apache-tomcat-8.0.0-RC10/conf in our case

Find the following:

 <!-- Define a non-SSL HTTP/1.1 Connector on port 8180 -->
    <Connector port="8080" maxHttpHeaderSize="8192"
               maxThreads="150" minSpareThreads="25" maxSpareThreads="75"
               enableLookups="false" redirectPort="8443" acceptCount="100"
               connectionTimeout="20000" disableUploadTimeout="true" />

and change the 8080 port to your required port.


Start on boot

To start the tomcat service on system boot create the file /etc/init.d/tomcat8 (I am using vi /etc/init.d/tomcat8) and fill it with:

#!/bin/bash 
# description: Tomcat Start Stop Restart 
# processname: tomcat 
# chkconfig: 234 20 80 
JAVA_HOME=/usr/java/jdk1.7.0_05 
export JAVA_HOME 
PATH=$JAVA_HOME/bin:$PATH 
export PATH 
CATALINA_HOME=/usr/share/apache-tomcat-8.0.0-RC10
 
case $1 in 
start) 
sh $CATALINA_HOME/bin/startup.sh 
;; 
stop) 
sh $CATALINA_HOME/bin/shutdown.sh 
;; 
restart) 
sh $CATALINA_HOME/bin/shutdown.sh 
sh $CATALINA_HOME/bin/startup.sh 
;; 
esac 
exit 0

Now set the permissions on the file and the catalina.sh file:

chmod a+x /etc/init.d/tomcat8
chmod a+x /usr/share/apache-tomcat-8.0.0-RC10/bin/catalina.sh

to start/stop/restart the service use:

service tomcat8 start
service tomcat8 restart
service tomcat8 stop

to start the service on boot use:

chkconfig --add tomcat8
chkconfig tomcat8 on

to disable it later you can use off instead of on:

chkconfig tomcat8 off


That’s it! you have your CentOS Tomcat server working and runing… 

how to speed website

How to speed up website load time

How to speed up website load time

How to speed up website load time is important question for those that performance matters to them.

Nobody Likes a Slow Website!


Overview

How to speed up website?

Website optimization is a required step for production, and when is automated when possible correctly it can help you deliver your website as fastest as possible without compromising on development comfortability and code readability.


Test your website load time speed

How to speed up website question could be answered for your case better if you’ll use a website speed test tools. There several good websites load time speed tests available online for free. check out pingdom website speed test, Google PageSpeed tools. this are very good tools which also gives you important and valuable information and tips to speed up your website.


pingdom

You can also check: WebPagetest, GTmetrix or PageScoring Website Speed Test.

Some of them rates your website and/or explain what could be done to make your site faster. you can learn also a lot from loading time graphs.collect information from all the above to optimize your website to maximum.

  • If it takes more then 10 seconds for your website to load. you are doing a very bad job optimizing your website (if at all).
  • If your page load time takes several seconds then you’re ok (but you can do better then that!).
  • if your page load time takes up to two seconds then your site is in very good shape!
  • if your page load time takes less then a second then your site is sooooo fast!! and you are doing a excellent job!

if your score is bad.. continue reading How to speed up website


How to speed up website load time

So, how to speed up your website load time?

You can do that using several tweaks.. one at a time…


1. learn the waterfall. where are your bottom neck ?

Use the mentioned websites speed test graphs to learn what are the slowest parts of your website and start with them. does the problem is with your webserver or maybe the infrastructure?

How to speed up website ? Does your static files load time is the problem?

And maybe it is the dns? processing request? loading the images? loading the scripts? maybe you have bad requests?

This extreme powerfull tool will help you learn your weaks and strongs.

how to speed website

how to speed website

2. Minimize redirects

If your website on load check if it’s mobile or not, then it redirect to another page when checks the language and then redirects to another page who check the cookies and then redirect… well you’ve got the idea. Bad design pattern!

Minimize redirects!


3. Browser caching

Set up your server to return Expire and Cache-Control headers with static files. Setup you expire date to be within week or more is a very good timeframe (depend on how frequently you update your website static files you can setup the expire date as required).


4. use CDN (if possible)

Content Delivery Network (CDN) can be an important tool in achieving decent page load and web application speeds. Providers such as AkamaiEdgeCast, Amazon (CloudFront), Rackspace (CloudFiles), Google (PageSpeed) and Microsoft (Azure CDN) are providing the means to distribute your content to locations geographically closer to your customers/users, which improves the responsiveness of the application or website.


5. put cache server between your server and your client when possible

Although using a CDN can help with page load speeds, a CDN is not always the best solution in terms of Cost–benefit.

when configuring a cache server before your website server, and no matter if it’s apache, tomcat, gunicorn or any other html generator you can boost up clients page load dramatically.


caching the compiled html pages is very important speed tweak. if you have any static and/or low-rate updated pages with no problem if some users will not see the lastest updates of the html when it changes (until cache reloads).. check varnish-cache or squid-cache or nginx (with HttpProxy module) or Apache with mod_proxy.

You should think of your webapp as in several seperate layers. where one layer could answering html requests and other serving your static files. always try to find the suitable tool for this mission in terms of speed (and taste). consider serving your static files (those not on CDN) using the fastest web server for static files you can find.


6. Minify

A very important stage is to minify data.

  • Minify CSS files for production! there are many simple gui or command tools to do that..
    if you are using LESS, SASS or other, Never compile on client side! compiler only on server side and setup your compiler to minify results.
  • Minify your JS files. if possible, insert them as scripts into the html, or better, minify and join them inside when processing the html (But don’t forget to use Cache server!).
    If you’re using Coffee-script and template engine it should be easier as you can compile the ,coffee file to minified version and include it within your template.
  • Minify HTML. if you have static html files use command or gui tool. if you have more advanced server like python or ruby – minify them before sumbit.
  • If your template engine support preprocessors. use them to minify HTML (and everything other you can). if not – use a library (if possible).


7. GZip

Configure you webserver (nginx, apache,etc)  to GZip response.

Set the Vary header (Vary: Accept-Encoding header) correctly for Internet Explorer.


8. Caching data

If you have data you can cache in memory for your application server – DO IT.

Use Redis, memcached or any other tool you find is suitable.

It can be small data (like the number of your followers you’ve just counted from facebook, twitter and youtube JSON calls) or the Entire processed HTML.

Put expire time for each resource on your store as needed.


How to speed up website

‘ How to speed up website ‘ tutorial ends here.

hope you’ll have fun optimizing your website and now you now few important tips on How to speed up website

Using those steps I’ve managed to reduced my website load time from several seconds to only 1-2 seconds (and sometimes less then second). It’s was worth the effort!!


Good day (or night),

Google Web Designer review – It’s the future?

Google Web Designer review

I’ve met today with the new Google Web Designer Beta – the new tool Google released for building adaptive, universally usable rich HTML based designes including ads.

The main purpose appears to be to provide a way to produce Adobe Flash-style animated in HTML5/CSS3 without using Flash.

“We think that Google Web Designer will be the key to making HTML5 accessible to people throughout the industry, getting us closer to the goal of ‘build once, run anywhere,’” Google engineer Sean Kranzberg posted

The Google Web Designer Youtube page is full of examples:


Google Web Designer

Starting Google Web Designer for the first time…

gwd-icon

Google Web Designer is available as a free (as in beer) download for Windows PC and Mac OS X, so at this stage, it won’t run on Linux, or Chromebooks.

Google Web Designer loading

Google Web Designer loading

Google Web Designer

Google Web Designer main screen

Product review

You have several presets to start from. You can start by creating a new Ad banner, or HTML / CSS / JS / XML as you can see:

gwb-presets


The UI is slick, and yet powerfull. You have great tools to work with creating your HTML file.

gwb-tools3D Object tools: You can move/rotate any object in 3D mode.

Text tool: You can write wherever you want in the document and not in HTML oriented direction (Position: absolute;)

Tag tool: Create blocks (DIV) of objects.

Pen tool: You can draw vectors. Just like Flash or Illustrator.

You can also find the Stroke tool and Fill tool as expected. also you can find the normal Zoom tool, Selection tool and Hand tool

One idea. Any screen.

Google Web Designer helps you create a responsive HTML. everything you create is accessible on any screen – desktop, tablet or mobile – without compatibility issues.

Amplify with code

If you’re feeling more hands-on, all the code behind your designs is hand-editable.

Two animation modes

In Quick mode, build your animations scene by scene and google web designer take care of the frames in between. In Advanced mode, animate individual elements using layers, easily changing the location of elements within the stack.

Full 3D authoring environment

Create and manipulate 3D content utilizing an array of tools and the power of CSS3. Rotate objects and even 2D designs along any axis, visualizing 3D transformations and translations as you author.


Summary

Although other Hacker News users reckon the code that GWD generates compares unfavorably to Microsoft FrontPage 2000. I found the code to be somehow fine, if inspected and modified manually. This tool is great for creating HTML parts (widgets) that are cross browser responsible (like ads, menu, carousel, etc.).

I still gonna play with Google Web Designer for sometime, but I must admit I was never the ‘HTML generator’ guy.. I don’t think that tools like that will take the job for the great HTML/CSS designers out there… How write their code using decent IDE.

It’s worth noting that projects like Adobe Muse/Dreamweaver, Reflow and others include most of Web Designer’s features, too. But by making Web Designer available for free, Google is putting quite a bit of pressure on the competitors.


That’s it. What do you think about Google Web Designer?

Django CentOS 6.4 installation instructions for noobs.

Django Centos 6.4 installation instructions for noobs.

So you want to build your first django centos 6.4 based web site? This is quite easy to install and configure. I’ll cover how to install Python/Django on your centos.

Django Centos

Prerequisite

  • CentOS 6.4 (For the matter of fact, this tutuorial is good for all the CentOS 6.x series)
  • Apache (httpd)


What is Python?

Python is a general-purpose, high-level programming language whose design philosophy emphasizes code readability. Its syntax is said to be clear and expressive.” from Wikipedia.

Visit http://www.python.org/


What is Django?

“Django is a high-level Python Web framework that encourages rapid development and clean, pragmatic design.” from https://www.djangoproject.com/

Installing Python

Prerequisites

you may need the EPEL repositories for Centos.

1
2
3
4
cd /opt/
wget http://mirrors.nl.eu.kernel.org/fedora-epel/6/i386/epel-release-6-8.noarch.rpm
rpm -Uvh epel-release-6-8.noarch.rpm
rm epel-release-6-8.noarch.rpm -f
cd /opt/
wget http://mirrors.nl.eu.kernel.org/fedora-epel/6/i386/epel-release-6-8.noarch.rpm
rpm -Uvh epel-release-6-8.noarch.rpm
rm epel-release-6-8.noarch.rpm -f


Installation Process

Simple as:

1
yum install python
yum install python

test python by typing: “python” and you should see something similar to: (CTRL+D to exit)

At the time of writing (September 30 2013), the version of python@EPEL is 2.6.6

Django works with any Python version from 2.6.5 to 2.7. It also features experimental support for versions 3.2 and 3.3. All these versions of Python include a lightweight database called SQLite so you won’t need to set up a database just yet unless you need other SQL


Installing SQL

Django works with several DB engines. for simplicity, Install SQLite:

yum install sqlite

If you need other SQL Server else then SQLite,  you can follow:
MySQL/MongoDB/CouchDB on RHEL/Centos 6.3
If you don’t need SQL and you installed Python 2.5 or later, you can skip this step for now.


Installing Django

You can install using EPEL repositories any yum (like in the old article I wrote), but I recommend to use the easy_install method from the python-setuptools package, which I’ll show next:

1
2
yum install python-setuptools
easy_install django
yum install python-setuptools
easy_install django


Testing Django

Test Django by typing python on your command and then:

1
2
import django
print django.get_version()
import django
print django.get_version()

python-django-1.5.4

As you can see, the RPM version is version 1.5.4, while the current release in the EPEL version is 1.3.1. Internationalization: in template code is not available in 1.3.1 for example but only from Django 1.4


Creating Project

From the command, cd into a directory where you’d like to store your app, then run the following command:

1
2
django-admin.py startproject mysite
cd mysite
django-admin.py startproject mysite
cd mysite

 Note: if you are installing Django using EPEL repos, the command will be django-admin and not django-admin.py.

Starting Server

1
python manage.py runserver

You’ve started the Django development server, a lightweight Web server – easier to startwithout having to deal with configuring a production server — such as Apache — until you’re ready for production.

Browse to http://127.0.0.1:8000/ with your Web browser. You’ll see a “Welcome to Django” page. It worked!

To change port:

1
python manage.py runserver 8080

If you need to start the server to answer not only locally, use:

1
python manage.py runserver 0.0.0.0:8000


Remember: Apache loads Django environment when starting and keep running it even when source is changed! I suggest you to use Django ‘runserver’ (which automatically restarts on source code changes) in development sessions, unless you need some Apache-specific features.


Configure more…

Config Database

Edit mysite/settings.py. It’s a normal Python module with module-level variables representing Django settings.

Help here.


Django using Apache

To run your Django application inside apache – use either mod_python or mod_wsgi, Support for mod_python will be deprecated in a future release of Django. If you are configuring a new deployment, you are strongly encouraged to consider using mod_wsgi or any of the other supported backends.


OPTION A: Install mod_python (NOT recommended)

For this to work, you must have apache installed and configured.

1
yum install mod_python

python using mod_python

you need to configure you apache/VirtualHost to:

    AddHandler mod_python .py
    PythonHandler mod_python.publisher | .py
    AddHandler mod_python .psp .psp_
    PythonHandler mod_python.psp | .psp .psp_
    PythonDebug On</pre>
[/code]

 
<h3>Testing mod_python</h3>
Create a '<em>test.py'</em> file in your apache server. put inside:
[code lang="py"]<% req.write("Hello World!") %>[/code]

and browse to www.your.server/test.py and you should see the "Hello World!" there.
<h3>Django using mod_python</h3>
Edit your <tt>httpd.conf</tt> file:

[code lang="apache"]
<pre><Location "/mysite/">
    SetHandler python-program
    PythonHandler django.core.handlers.modpython
    SetEnv DJANGO_SETTINGS_MODULE mysite.settings
    PythonOption django.root /mysite
    PythonDebug On
</Location>

read more…


Option B: Install mod_wsgi (RECOMMENDED)

Deploying Django with Apache and mod_wsgi is the recommended way to get Django into production.

1
yum install mod_wsgi


to use mod_wsgi, create an apache folder inside your project and create a django.wsgi file:

import os, sys
sys.path.append('/var/www/django')
sys.path.append('/var/www/django/mysite')
os.environ['DJANGO_SETTINGS_MODULE'] = 'mysite.settings'

import django.core.handlers.wsgi

application = django.core.handlers.wsgi.WSGIHandler()


and configure your apache with:

<VirtualHost *:80>

ServerName www.example.com
ServerAlias www.example.com
WSGIScriptAlias / /var/www/django/mysite/apache/django.wsgi

# Alias /robots.txt /var/www/django/mysite/static/robots.txt
# Alias /favicon.ico /var/www/django/mysite/static/favicon.ico
Alias /static/admin/ /usr/lib/python2.6/site-packages/django/contrib/admin/media/
Alias /static/ /var/www/django/mysite/static/
Alias /media/ /var/www/django/mysite/media/

<Directory /var/www/django/mysite>
Order allow,deny
Allow from all
</Directory>

<Directory /var/www/django/mysite/media>
Order deny,allow
Allow from all
</Directory>

<Directory /var/www/django/mysite/static>
Order deny,allow
Allow from all
</Directory>
</VirtualHost>


read more on: multiple django sites with apache & mod_wsgi


That’s it!


You’ve Python / Django installed on your Centos 6.4 and a new project template waiting for you to work on.


Continue reading…

* this article is an edited version of an older article.

PHP GitHub followers count script (v3.0 API)

Php GitHub Followers Count

The following PHP GitHub Followers Count script is using the v3.0 GitHub API.


Overview

 I’ll explain how to get your github  followers count using PHP.


Get Followers Count

</span>

<?php
function curl_get_contents($url)
{
$ch = curl_init();
curl_setopt($ch, CURLOPT_URL, $url);
curl_setopt($ch, CURLOPT_RETURNTRANSFER, 1);
curl_setopt($ch, CURLOPT_FOLLOWLOCATION, 1);
curl_setopt($ch,CURLOPT_USERAGENT,'Mozilla/5.0 (Windows; U; Windows NT 5.1; en-US; rv:1.8.1.13) Gecko/20080311 Firefox/2.0.0.13');
$data = curl_exec($ch);
curl_close($ch);
return $data;
}
$github_data = json_decode(curl_get_contents('https://api.github.com/users/your-user-name'), true);
$github_followers_count = $github_data['followers'];
echo $github_followers_count;
?>


More information

This article was based on the work of Jimbo and Meenakshi Sundaram R

PHP Twitter Followers Count script (v1.1 API)

Php Twitter Followers Count

The following PHP Twitter Followers Count script is using the new v1.1 Twitter API.


Overview

Recently, Twitter have changed their API and v1.0 is obselete. The new API requires OAuth. I’ll explain how to get your twitter followers count using PHP.


Create Application

First, you’ll need to get yourself a twitter dev account, if you haven’t done so yet.

Go here and register your app free.


TwitterAPIExchange

Download the TwitterAPIExchange library files created by J7mbo into your application.

you can git clone https://github.com/J7mbo/twitter-api-php.

I recommend the git method as you can git pull later to recieve updated.


Get Followers Count

Insert your OATH and Consumer Access-Token & Access-Token secret the the following code. Also, change the $getfield screen name to yours.

Now combine everything to make it work

require_once('TwitterAPIExchange.php');

/** Set access tokens here - see: https://dev.twitter.com/apps/ **/
$settings = array(
'oauth_access_token' => "YOUR_OAUTH_ACCESS_TOKEN",
'oauth_access_token_secret' => "YOUR_OAUTH_ACCESS_TOKEN_SECRET",
'consumer_key' => "YOUR_CONSUMER_KEY",
'consumer_secret' => "YOUR_CONSUMER_SECRET"
);

$ta_url = 'https://api.twitter.com/1.1/statuses/user_timeline.json';
$getfield = '?screen_name=replace_me;
$requestMethod = '
GET';
$twitter = new TwitterAPIExchange($settings);
$follow_count=$twitter->setGetfield($getfield)
->buildOauth($ta_url, $requestMethod)
->performRequest();
$data = json_decode($follow_count, true);
$followers_count=$data[0]['
user']['followers_count'];
echo $followers_count;


Notes

I’ve placed the entire twitter-api-php folder inside my project. you can extract the files also, but make sure to require_once() from the correct path.

require_once(‘twitter-api-php/TwitterAPIExchange.php’);

if you’ve placed it inside the folder, or

require_once(‘TwitterAPIExchange.php’); if you extracted the files to the same folder as your script.


More information

This article was based on the work of Jimbo and Meenakshi Sundaram R

Django Centos 6 Beginners Installation Guide

NOTE: This article was rewritten for CentOS 6.4. please read the updated post.


Django Centos 6

So you want your first django centos based web site? This is quite easy to install and configure. I’ll cover how to install Python/Django on your centos.

Django Centos

Prerequisite

  • Centos 6.x
  • Apache (httpd)


What is Python?

Python is a general-purpose, high-level programming language whose design philosophy emphasizes code readability. Its syntax is said to be clear and expressive.” from Wikipedia.

Visit http://www.python.org/


What is Django?

“Django is a high-level Python Web framework that encourages rapid development and clean, pragmatic design.” from https://www.djangoproject.com/

Installing Python

Prerequisites

you may need the EPEL repositories for Centos.

1
2
3
4
cd /opt/
wget http://mirrors.nl.eu.kernel.org/fedora-epel/6/i386/epel-release-6-8.noarch.rpm
rpm -Uvh epel-release-6-8.noarch.rpm
rm epel-release-6-8.noarch.rpm -f
cd /opt/
wget http://mirrors.nl.eu.kernel.org/fedora-epel/6/i386/epel-release-6-8.noarch.rpm
rpm -Uvh epel-release-6-8.noarch.rpm
rm epel-release-6-8.noarch.rpm -f


Installation Process

Simple as:

1
yum install python
yum install python

test python by typing: “python” and you should see something similar to:

As for this time being of writing (June 18 2012), the version of python@EPEL is 2.6.6

Django works with any Python version from 2.6.5 to 2.7. It also features experimental support for versions 3.2 and 3.3. All these versions of Python include a lightweight database called SQLite so you won’t need to set up a database just yet unless you need other SQL


Installing SQL

If you need other SQL Server else then SQLite,  you can follow:
MySQL/MongoDB/CouchDB on RHEL/Centos 6.3
If you don’t need SQL and you installed Python 2.5 or later, you can skip this step for now.


Installing Django

1
yum install Django
yum install Django


Testing Django

Test Django by typing python on your command and then:

1
2
import django
print django.get_version()
import django
print django.get_version()

As you can see, the RPM version is version 1.3.1, while the current release version is 1.4.1. while you are not too far behind using EPEL, you won’t get to play with the last options. Internationalization: in template code is not available in 1.3.1 for example but only from Django 1.4


Creating Project

From the command, cd into a directory where you’d like to store your app, then run the following command:

1
2
django-admin startproject mysite
cd mysite
django-admin startproject mysite
cd mysite


Starting Server

1
python manage.py runserver

You’ve started the Django development server, a lightweight Web server – easier to startwithout having to deal with configuring a production server — such as Apache — until you’re ready for production.

Browse to http://127.0.0.1:8000/ with your Web browser. You’ll see a “Welcome to Django” page. It worked!

To change port:

1
python manage.py runserver 8080

If you need to start the server to answer not only locally, use:

1
python manage.py runserver 0.0.0.0:8000


Remember: Apache loads Django environment when starting and keep running it even when source is changed! I suggest you to use Django ‘runserver’ (which automatically restarts on source code changes) in development sessions, unless you need some Apache-specific features.


Configure more…

Config Database

Edit mysite/settings.py. It’s a normal Python module with module-level variables representing Django settings.

Help here.


Django using Apache

To run your Django application inside apache – use either mod_python or mod_wsgi, Support for mod_python will be deprecated in a future release of Django. If you are configuring a new deployment, you are strongly encouraged to consider using mod_wsgi or any of the other supported backends.


Install mod_python

For this to work, you must have apache installed and configured.

1
yum install mod_python

python using mod_python

you need to configure you apache/VirtualHost to:

    AddHandler mod_python .py
    PythonHandler mod_python.publisher | .py
    AddHandler mod_python .psp .psp_
    PythonHandler mod_python.psp | .psp .psp_
    PythonDebug On</pre>
[/code]

 
<h3>Testing mod_python</h3>
Create a '<em>test.py'</em> file in your apache server. put inside:
[code lang="py"]<% req.write("Hello World!") %>[/code]

and browse to www.your.server/test.py and you should see the "Hello World!" there.
<h3>Django using mod_python</h3>
Edit your <tt>httpd.conf</tt> file:

[code lang="apache"]
<pre><Location "/mysite/">
    SetHandler python-program
    PythonHandler django.core.handlers.modpython
    SetEnv DJANGO_SETTINGS_MODULE mysite.settings
    PythonOption django.root /mysite
    PythonDebug On
</Location>

read more…


Install mod_wsgi

Deploying Django with Apache and mod_wsgi is the recommended way to get Django into production.

1
yum install mod_wsgi


to use mod_wsgi, create an apache folder inside your project and create a django.wsgi file:

import os, sys
sys.path.append('/var/www/django')
sys.path.append('/var/www/django/mysite')
os.environ['DJANGO_SETTINGS_MODULE'] = 'mysite.settings'

import django.core.handlers.wsgi

application = django.core.handlers.wsgi.WSGIHandler()


and configure your apache with:

<VirtualHost *:80>

ServerName www.example.com
ServerAlias www.example.com
WSGIScriptAlias / /var/www/django/mysite/apache/django.wsgi

# Alias /robots.txt /var/www/django/mysite/static/robots.txt
# Alias /favicon.ico /var/www/django/mysite/static/favicon.ico
Alias /static/admin/ /usr/lib/python2.6/site-packages/django/contrib/admin/media/
Alias /static/ /var/www/django/mysite/static/
Alias /media/ /var/www/django/mysite/media/

<Directory /var/www/django/mysite>
Order allow,deny
Allow from all
</Directory>

<Directory /var/www/django/mysite/media>
Order deny,allow
Allow from all
</Directory>

<Directory /var/www/django/mysite/static>
Order deny,allow
Allow from all
</Directory>
</VirtualHost>


read more on: multiple django sites with apache & mod_wsgi


That’s it!


You’ve Python / Django installed on your Centos 6.3 and a new project template waiting for you to work on.


Continue reading…

* this article is an edited version of an older article.